![[Updated] Everything you need to know about notes, notetaking and organizing notes in TradesViz trading journal v2.0](/media/blog/notes_complete_guide/notes_complete_guide.png)
We released our original note-taking features almost 4 years ago. This was called the notes tab and is still the most novel and efficient way to organize and manage notes in any trade journaling solution.
Many upgrades to how notes are handled were added to TradesViz, but we did not change the core features of note-taking on the notes tab as this is still one of the main features that users like in TradesViz.
About a year ago, we introduced an automated notes-merging feature where users can enter notes while trading, and these notes will be automatically merged with the trades made during the time of writing the note when the next import happens. Since most users have moved towards automated import of trades, this makes the entire journaling process seamless with almost no need to do any "post" trading manual journal writing process.
We recently have been getting a lot of requests on how to utilize the notes feature for different use cases and we intend to address those questions in this detailed blog post.
Trade vs Day vs Misc Notes
Unlike other journals, TradesViz has 3 types of notes which we explain below:
- Trade note: This is a note that is attached to a single trade. The type of note most users must have used in other journals, excel sheets, etc., and the most common type of note. You can write a note about a single trade and this typically contains details of what you did in that trade, rules you followed, and even images related to that trade (although, we recommend uploading images separately for each trade/day via the image section of the day/trade explore for better organization). The real-time notes are initially misc notes (not attached to any day or a trade) and after adding/syncing your trades, once they get attached to a trade, they become a trade note.
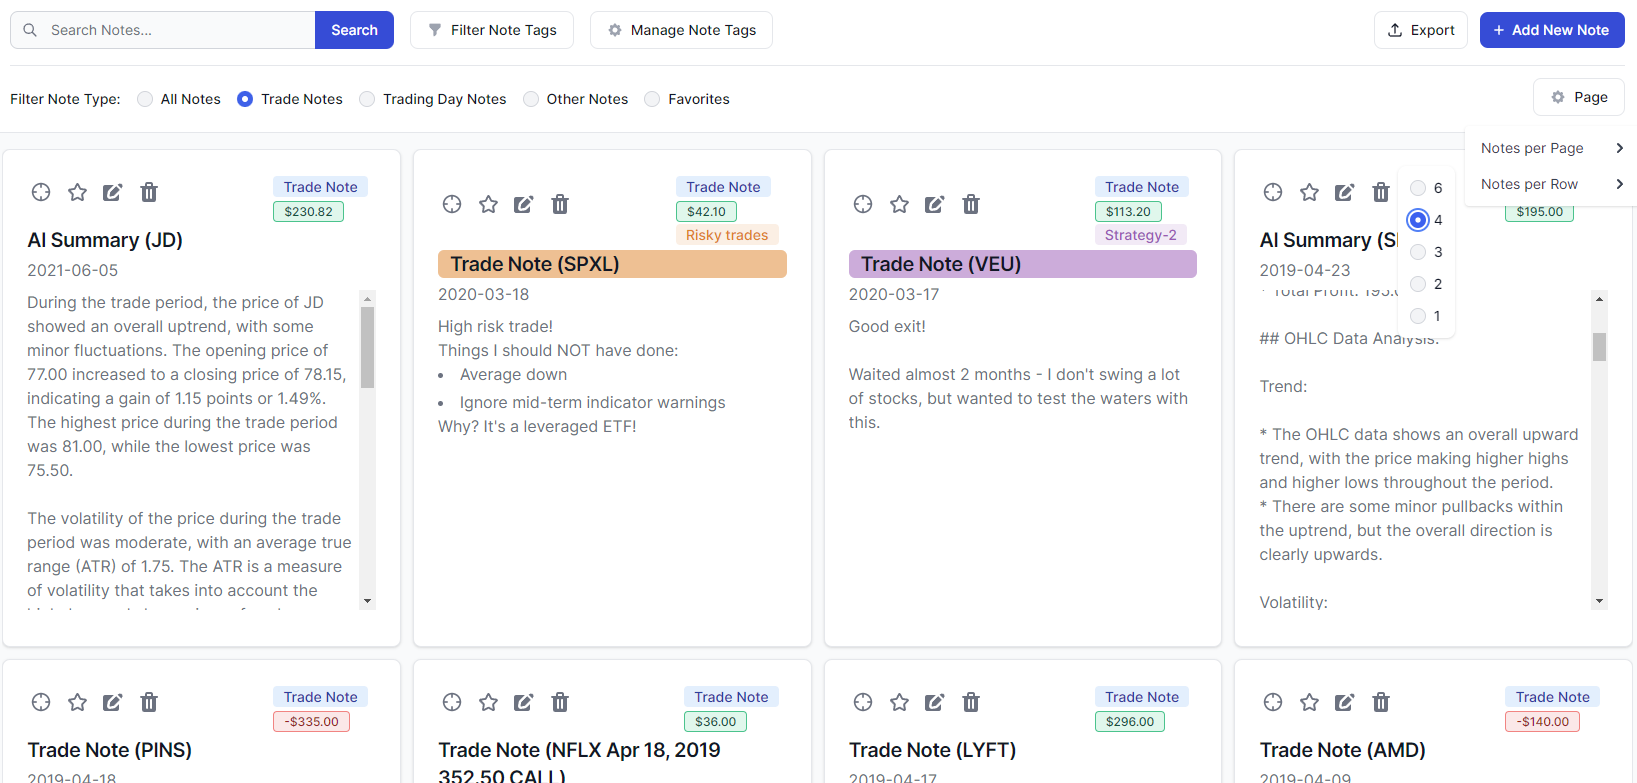
Trade notes are easily filterable because there are a lot of trade-property-specific filters on TradesViz. Trade notes can be found on:
Notes tab
Any trades table (as a column)
Unified view
Charts view
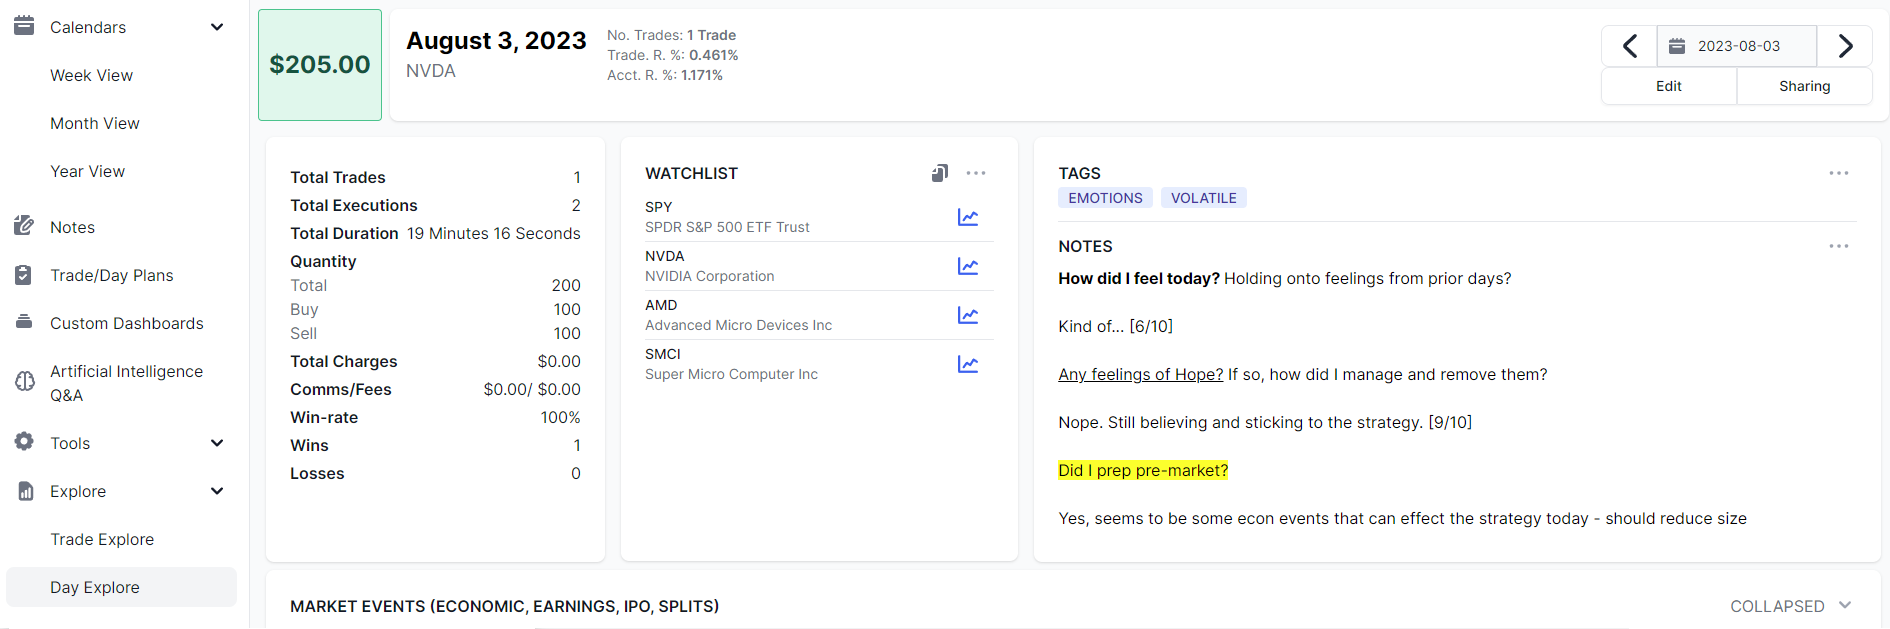
- Day note: This is a note that is attached to a single date. Most other journaling solutions force you to write notes only on trades thus making note searching and organization very difficult. This also eliminates any type of planning you can do *before* trading.
The day notes in TradesViz can be used for both pre- and post-trading analysis/planning as a trading day always exists, unlike a trade. You can pick any date on the calendar tab which will direct you to the day explore view. In this view, clicking on the 3 dots icon in the notes area will open the day note editor.
Suppose you want to write down how you are feeling before trading, your trading plans for the day, or specific strategies you want to change/focus on, you can write all that down there before trading.
Similarly, after trading, you can reflect on how your trading day was, what types of opportunities you saw, what mistakes you made, etc., by writing them in the day note section.
Day notes can be found on:
Day grouped table
Notes tab
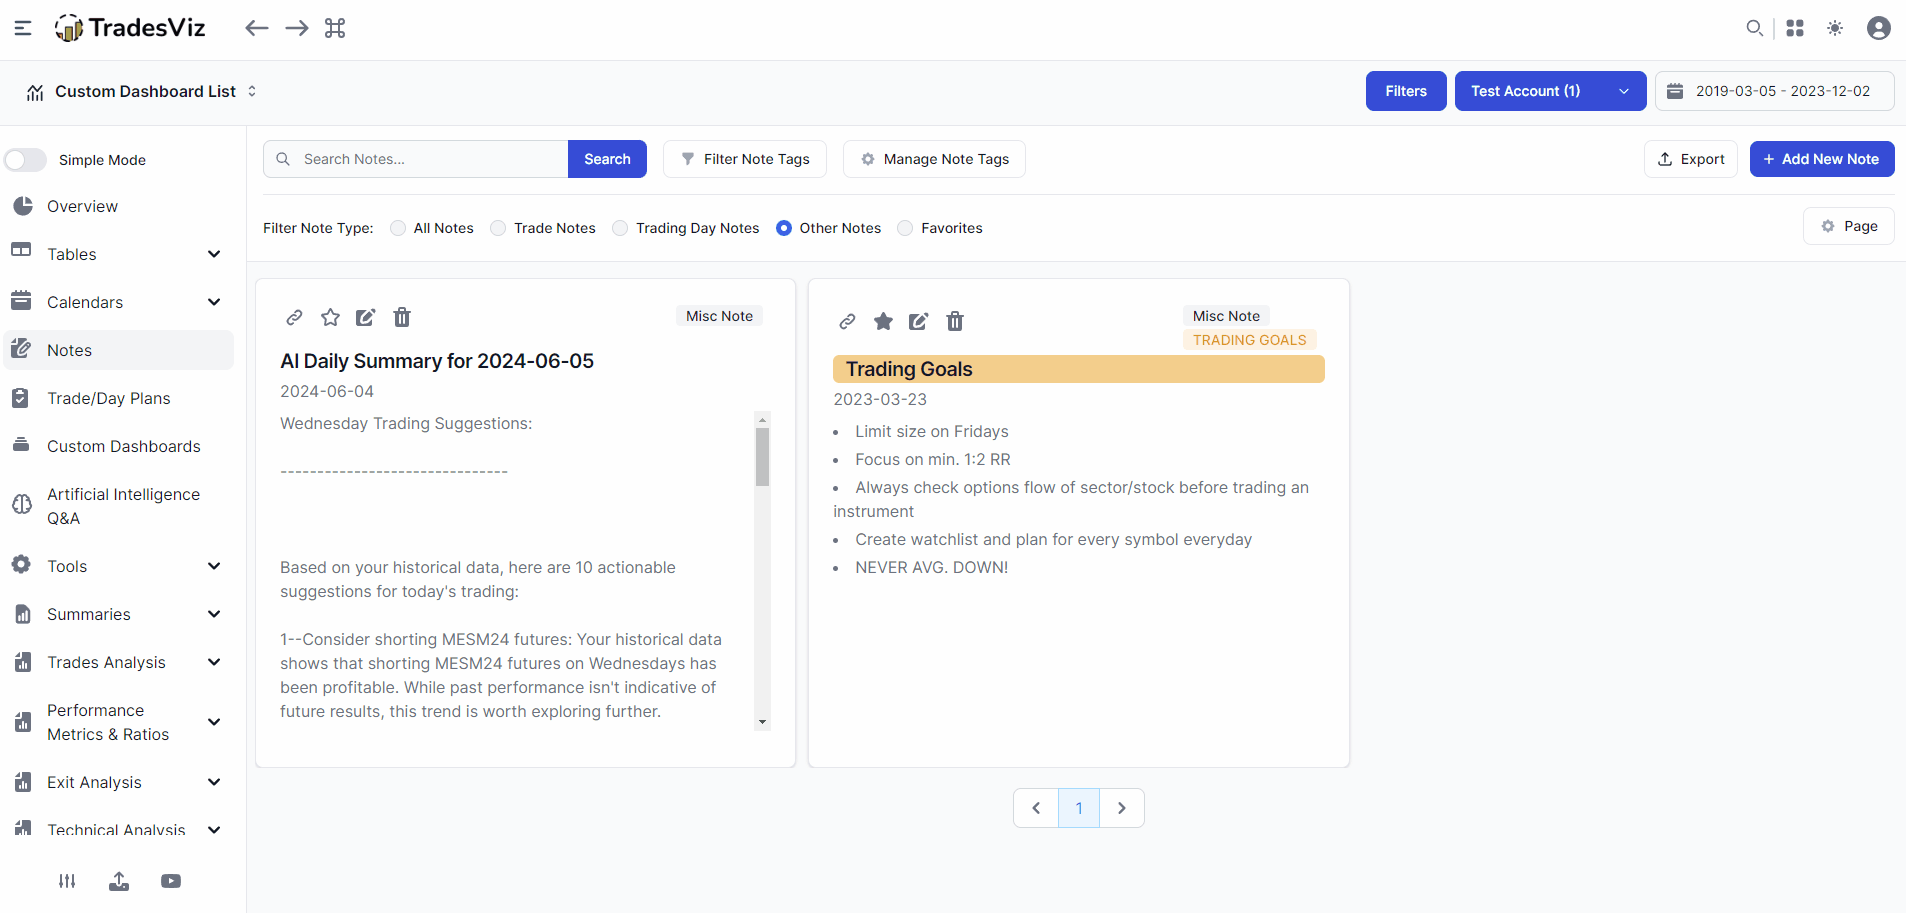
- Misc note: This is a note that is NOT attached to any other entity when created HOWEVER they CAN be linked to ANY trade or day. If there are just notes or text content that you want to write down that you think cannot be categorized into any particular trade or day, this is the place to write it down.
For example, this can be goals that you want to achieve for the month/week/year, etc., your learnings, long-term stocks watchlist, or - well, pretty much ANYTHING.
Misc notes can only be found on the notes tab and the only way to add it is by clicking on the "Add" button in the notes tab.
Clicking on the link icon at the top left corner of any misc notes lets you tag the misc note to any trade (where it becomes a trade note) or to any day (where it becomes a day note)
This is extremely useful for writing down notes before/during trading and then organizing them afterward.
Notes organization: Note tags (vs Trade/Day tags)
Now that we have a basic understanding of where we should put our data into, let's look into how to organize them.
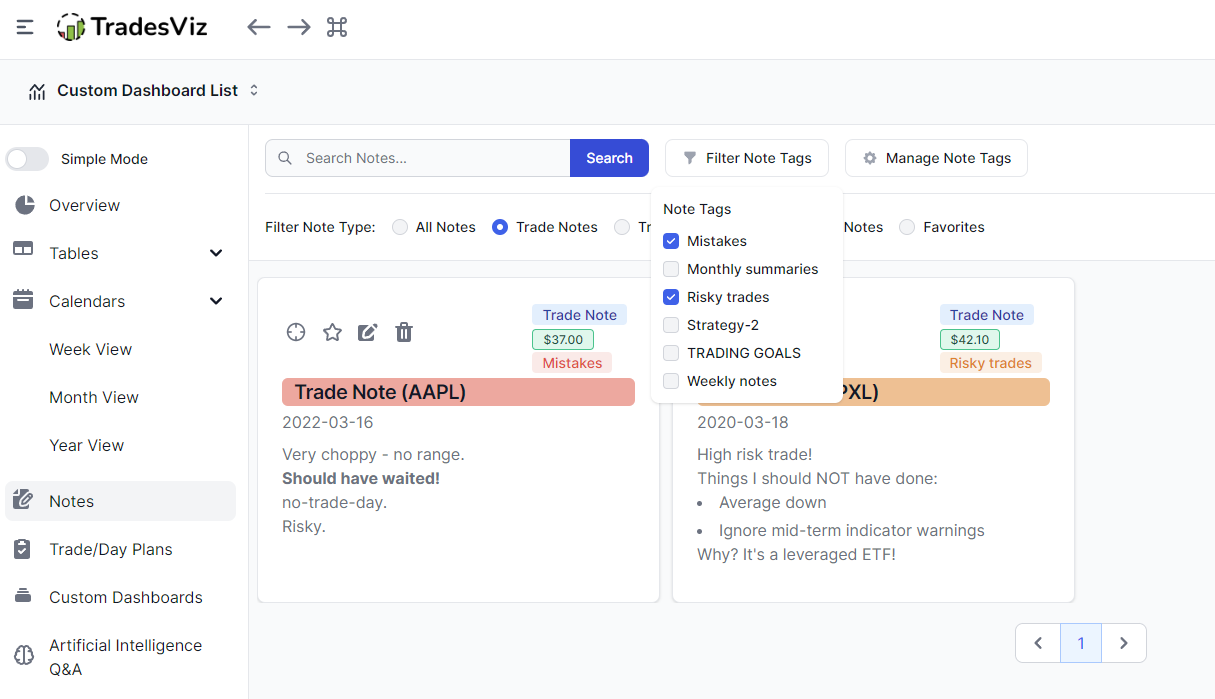
In the notes tab, you will notice a "Note tags" section on the left side. This is where you can manage your note tags.
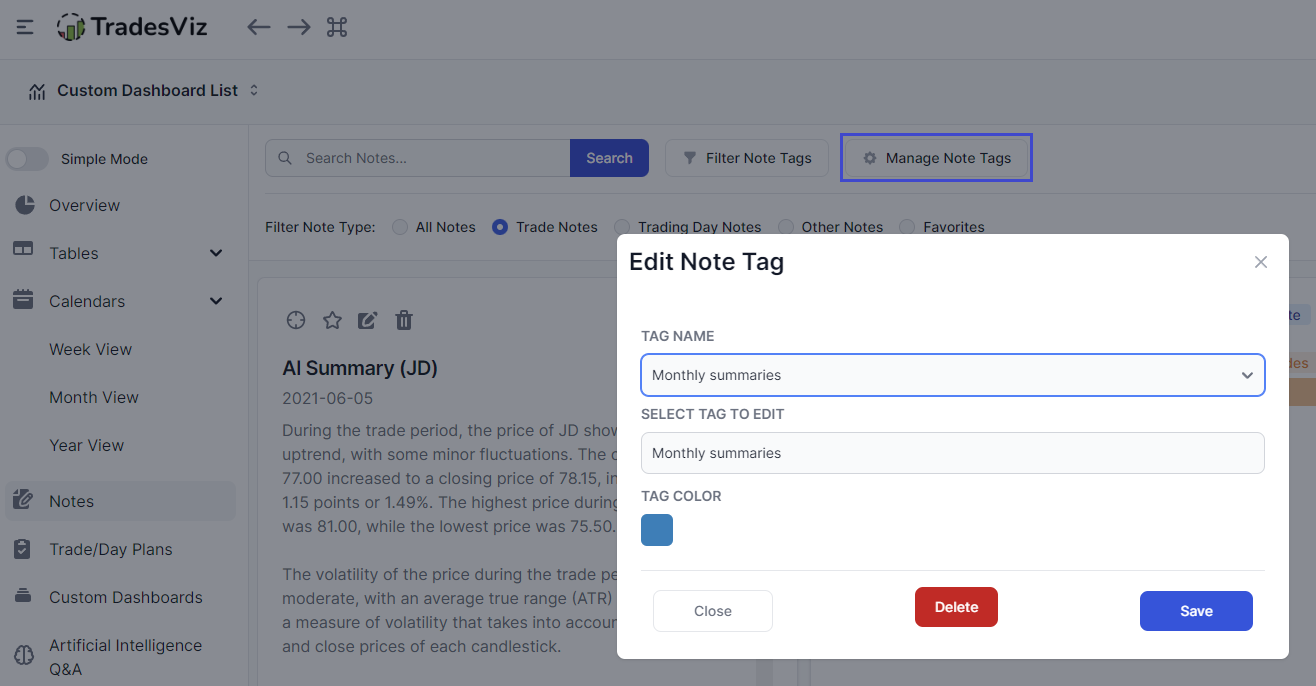
Please understand that the note tags are completely different and separate from the trade/trading day tags. They do not have anything in common and one cannot be used for another.
The note tags combined with the multiple types of notes give you the ultimate flexibility in organizing notes *exactly* the way you want. This type of versatility is not possible in ANY other journaling solution.
To add a tag to a note is very simple, all you have to do is click on the pencil icon in any note and select from the list of tags at the bottom.
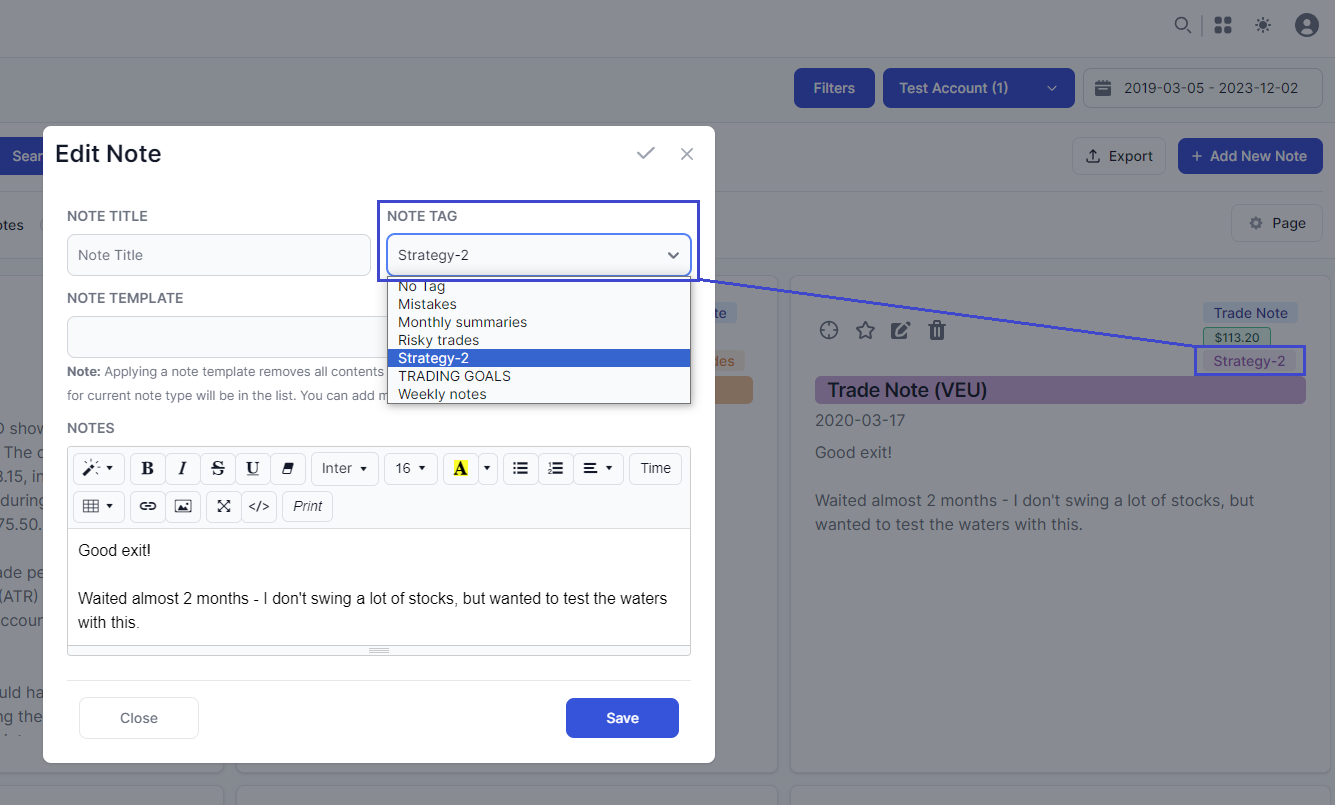
Each tag can have a unique color and a name and you can assign ANY note tag to ANY type of note (trade, day, and misc.). In the example above, we have attached a "TRADING GOALS-1" tag that is yellow in color to a misc. note which is shown as an example in the misc note section at the beginning of this blog.
The background of the note's title in the note tab will change according to the color of the tag. Example:
Note tags usage examples
There are limitless use-cases for note tags. Here are some of them:
- You can create a note tag for each strategy type
- You can create note tags for each week/month or year and add them to day notes or misc-notes - this combined with the filters present in the notes tab make for calendar-based notes view
Simply clicking on the tag will filter notes accordingly allowing you to quickly view/edit trades. - You can create note tags for events that happen on particular days and attach them to day notes only
- Prefixing a note tag with "T-" or "D-" or something similar can help you easily differentiate between day/trade-specific tags.
Notes organization: Searching for notes & filtering notes
The video below shows filtering, searching on the notes tab, and also filtering using global filters. Note that global filters are typically for trades so using them to filter trade-based notes yields the best results.
Click to play:
Types of filtering explored in the above video:
- Note type filtering (All notes/trade notes etc.,) - only one selection allowed
- Note tag filtering (can be combined with note type filtering) - multiple selections allowed
- Global filters - trade property-based filtering - can be combined with both above filters
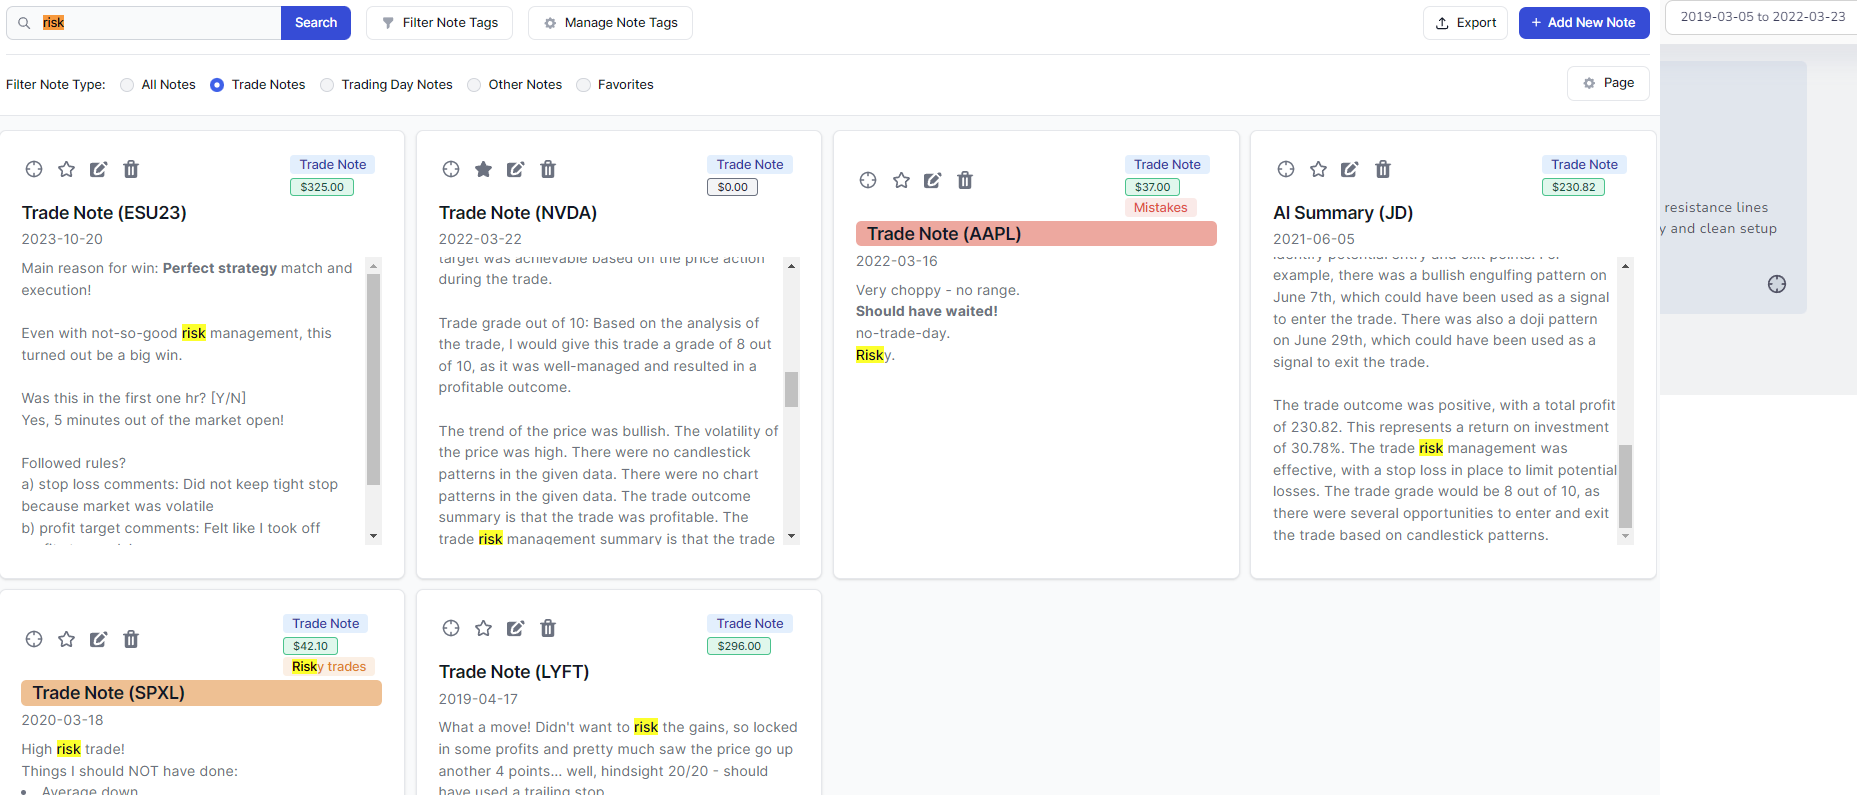
You can also search notes by entering text into the search box. Here's an example of searching for the term "trade":
Note-taking: Best practices
- Do not copy and paste notes from external sources like websites or other note-taking tools. Since all web-based content is formatted in a specific way, this pasted content will contain a lot of extra CSS/styling that will contribute to the note size limit. It is highly recommended to only use the built-in rich text editor. It is ok if you are pasting from a notepad or some plain text source.
- If you are going to copy and paste from an external source, please use Ctrl+Shift+V to paste or right-click inside the text area and select "Paste as plain text" to avoid "note too long" error messages.
- It is better to use the dedicated image upload features in day and trade explore pages instead of pasting images because adding images via the image uploader gives you additional flexibility in modifying or editing the image. This is not possible if you paste the image into the notes.
- Reserve excessively long notes to misc. note types. Keep the trading and day notes as short and succinct as possible so that when you review your trades, you are able to view the content quickly and efficiently without much scrolling.
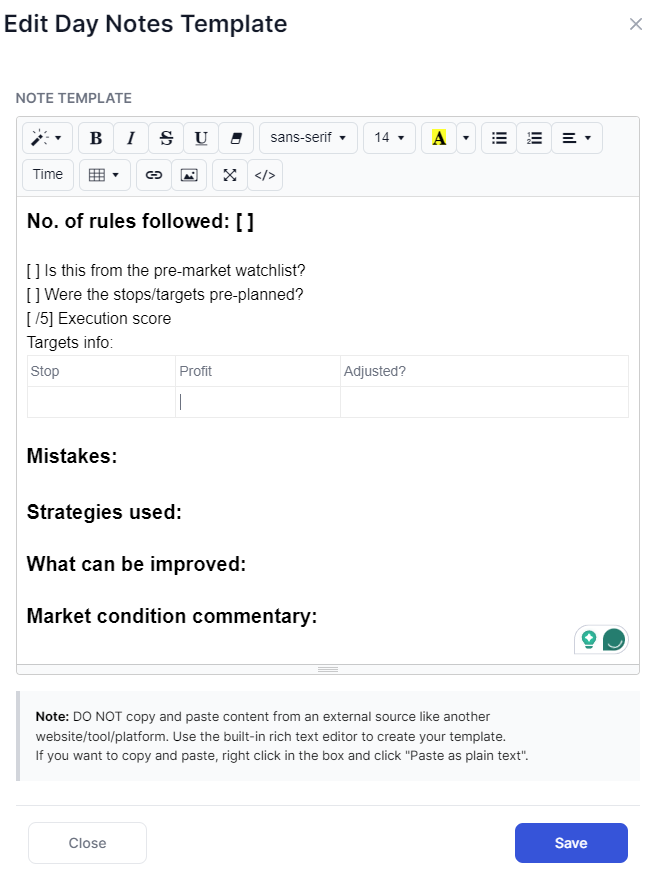
- Use templates (day, trade, and misc notes) to speed up your note-taking process.
- Take backups of your notes by clicking on "Export notes" button in the note tab frequently.
Note-taking: Using templates
In addition to using note tags, there is another note-specific feature that is extremely useful to frequent note-takers and that is note templates.
Templates are pre-filled in content that automatically appears when you try to create any type of note. This saves a lot of time when you are writing notes for a large number of trades.
You can access the note templates for all the 3 types of notes in the account settings.
In the notes tab when a note is created by clicking "Add note", it is a misc note, so the misc template is attached to that note. When a note is created from within a day explore tab, the day template is inserted. When a note is created within a trade explore tab or via the edit icon in the trades table, the trade template is added to the note.

Here's an example of a simple trade template that fills in some checkbox-like content and titles for notes:
You don't need fancy checkboxes or radio buttons. Statements like the ones below convey the same info as a filled checked box - without the extra necessary styling that can cause slowness or complication of notes:
The above is equivalent to:
Keep your notes simple and mostly text-only. Why? That makes it searchable and easy to edit/organize.
AI Notes Features
One of the big differences between the old and new TradesViz is the addition of useful AI features. We've added 2 new notes features where you can let AI generate content for you based on your data + the market data for added context.
AI Trade Summary
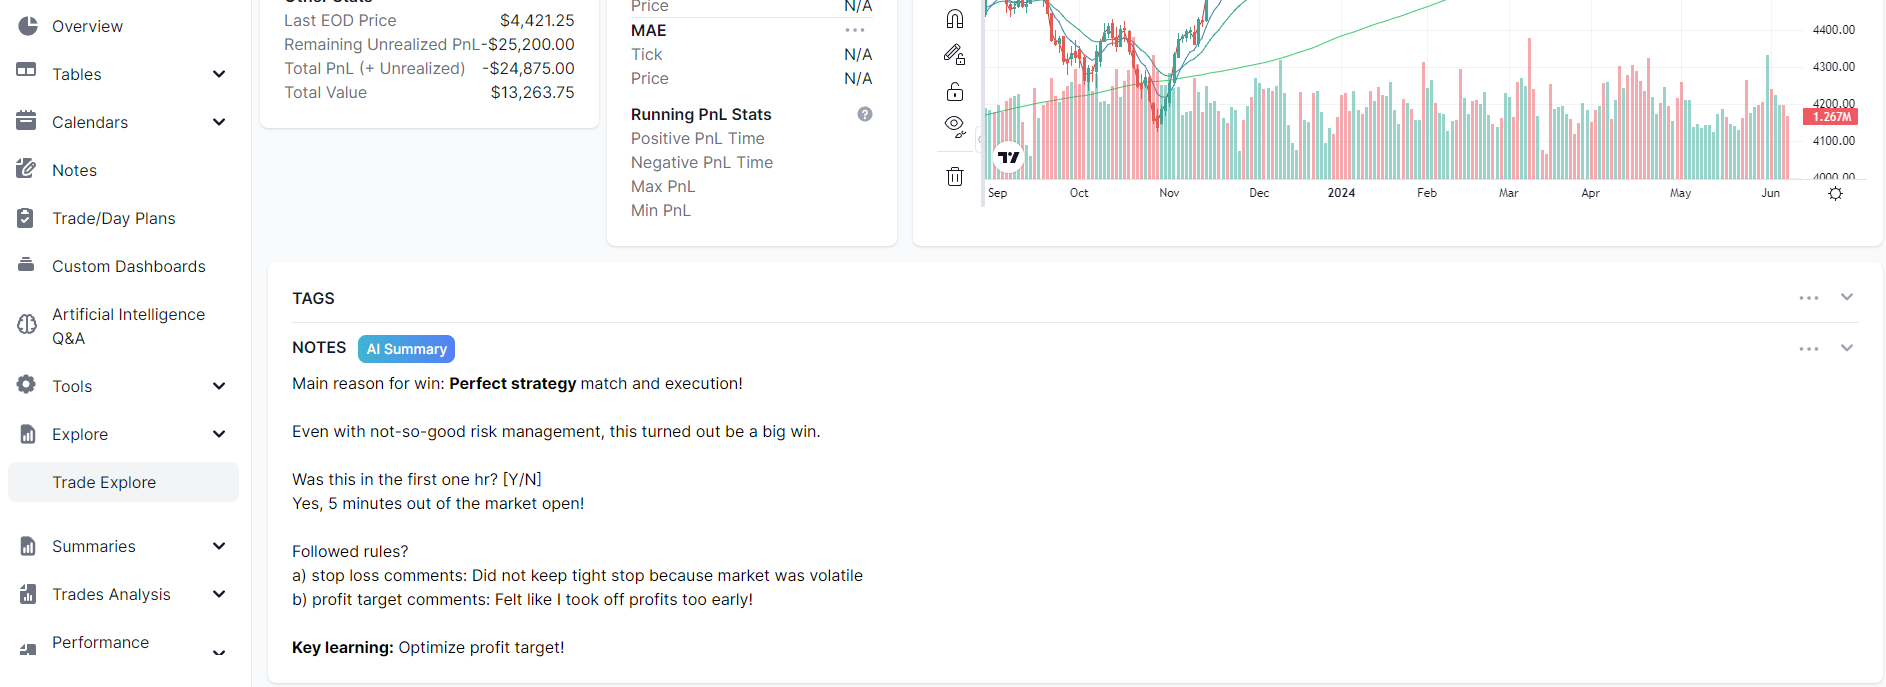
An in-depth blog post about this is available in a separate blog post so we will just show you a few examples on how to use the feature here. To generate AI notes, the easiest way is by exploring a trade and then clicking on the generate "AI Summary" button in the notes section.

This will take your trade data + data of the underlying asset type and give you a complete overview of the trade including technical analysis, potential targets, support, resistance, overall trend, etc.,
We're leveraging the power of AI to get useful summaries of your trades that you can view at any time. For example, viewing these notes for your trades in the unified view is as comprehensive as it gets when it comes to trade reviewing.
Another way to generate this is via "group apply" function in the trades table. You can use this to generate an AI summary for many trades at once.
AI Daily Summary
Why stop at a single trade when you can also get a summary of your recent trade history every single day? That's exactly what this feature does. Instead of just using your current trade and market data (where there is a high degree of focus on technical analysis for a single trade), we're using more of the trade data (including tags, risk values, etc.,) of recent trades (or any trades from a certain date based on your input) and getting a summary purely using your trading data.
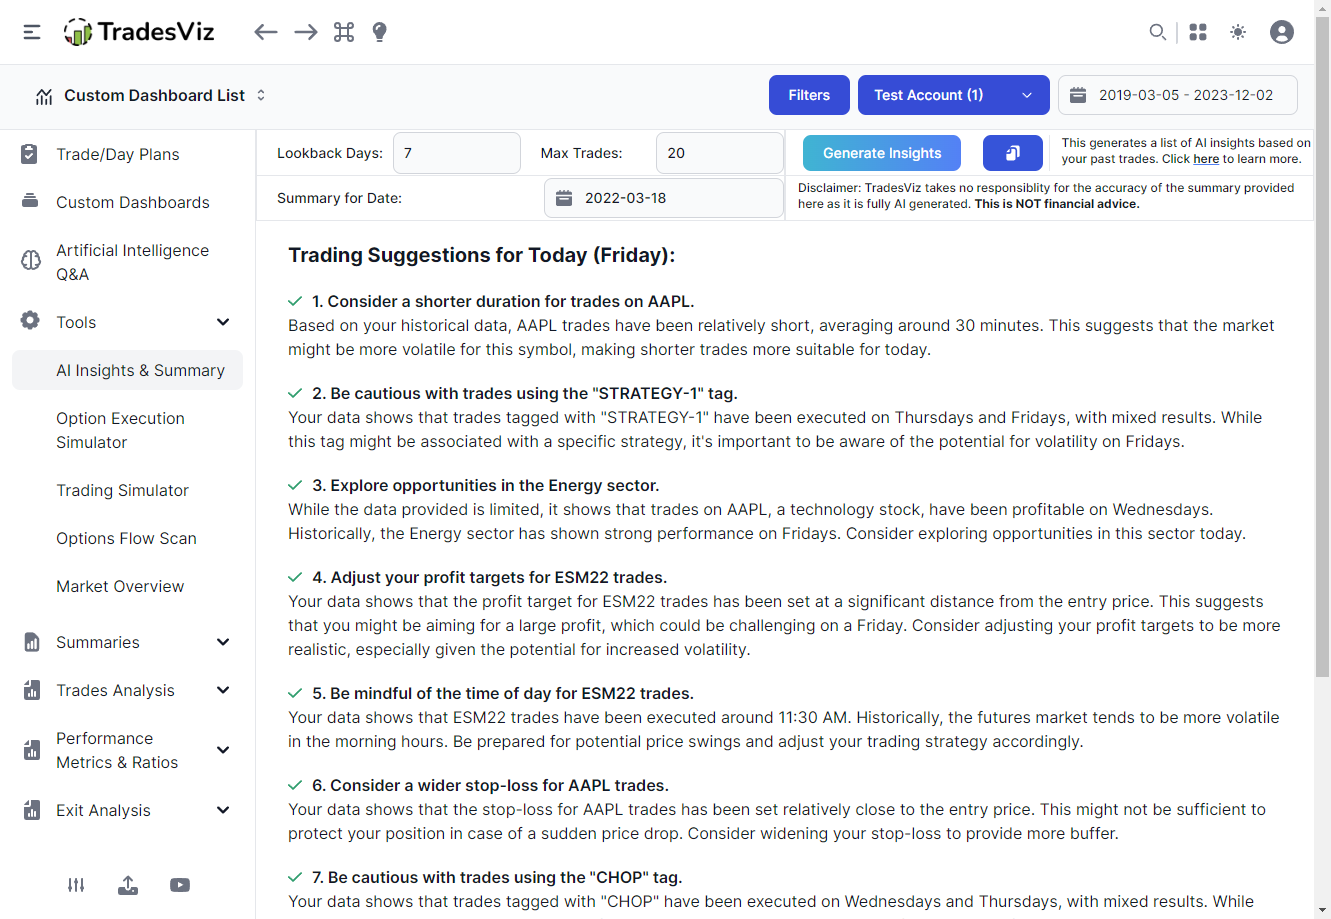
All the additional inputs - like stops, and tags now have a lot more value because they can be used by the AI to provide you useful and actionable insights every day. The content generated in this AI insights tab can be added as a day note or a misc note.
We hope this guide has provided you with all the information you need to know to effectively utilize the note-taking features of TradesViz. There is no other platform with this level of versatility when it comes to note-taking - a feature that we consider to be pivotal for journaling. In the upcoming updates, we will be focusing more on adding more context to trades that are analyzable.
Do you have any questions? Feedback or feature requests? Please drop us an email at [email protected]