As we near the 100% complete v2.0 transformation of the TradesViz trading journal, certain non-dashboard pages have changed mostly in UI with utility improvements. We wanted to consolidate all the different ways to import trades into TradesViz with the changes in the UI and list them in this blog post.
This should serve as an all-in-one guide for all new/existing users who want to learn about the different types of ways to import/add, edit, and delete trades.
There we will split this into two sections: importing data and managing imported data. The first section will contain the 3 types of import methods - i.e., manual imports, sync method and manually adding trades. The second second will contain info on different ways to edit /delete a trade and execution.
Different ways to get your trades into TradesViz
Manual file imports
The most commonly used method to get your trades into your journal: importing a file from your broker. Typically this is an orders or executions report that you download from your broker. This file would contain information about your trades/executions. TradesViz ONLY imports your trading transactions. This means we do not import any account-based transactions like deposits, withdrawals dividends, etc., You can add your deposits/withdrawals to your trading accounts via the dashboard at any time. This is done by clicking on the "Equity curve" tab under the "Summary" section on the left side of your dashboard.
To import your files into TradesViz,
- Visit tradesviz.com/import [or] click on the profile icon on your dashboard (top right corner) and click on import/export [or] click on the upload icon at the bottom left corner of your dashboard.
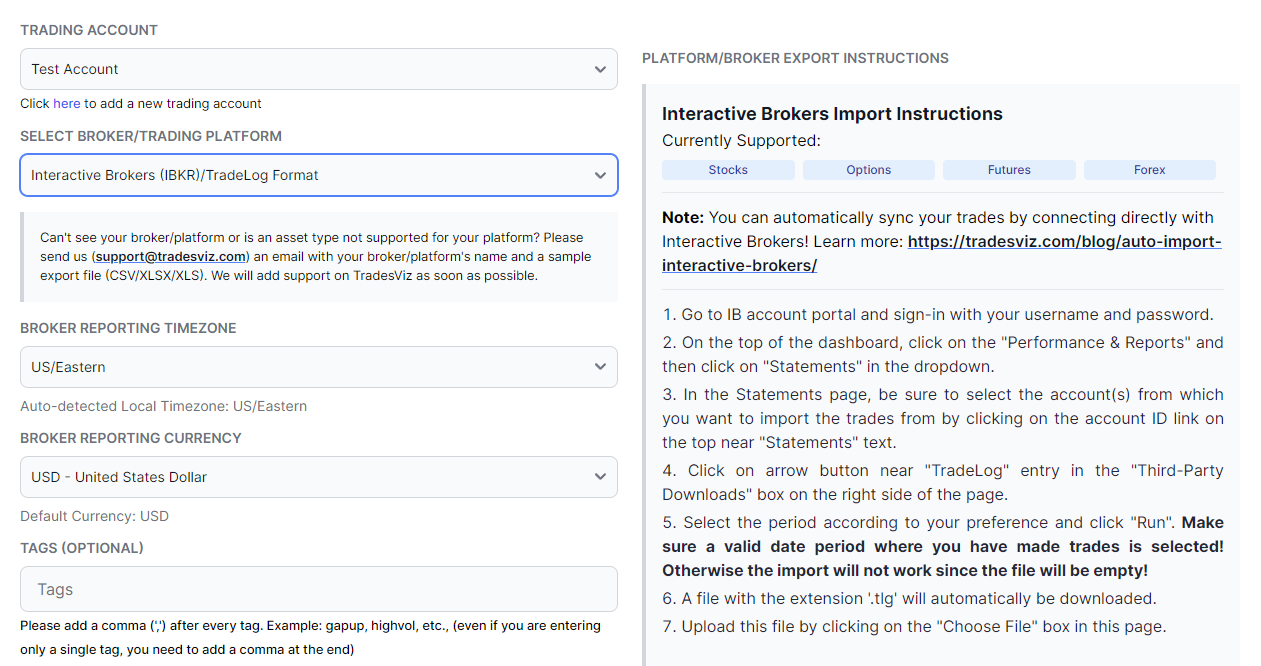
- Once on the import page, you need to first select the trading account that you want to import (you can add multiple trading accounts by visiting your account settings page) the trades into and then select your broker/platform. You should now see instructions that appear on the right side of the page. Follow these instructions *exactly* and download the file (note that for some brokers, you may need to copy/paste data but always rely on the instructions and do exactly as it is mentioned).
95% of import issues are due to NOT following import instructions and/or using the wrong import file
- Below the platform selection, you will see a few more settings like timezone and currency. The timezone is the timezone in which the trades in the file you are about to import are reported. This may vary based on the broker. If you are unsure about the timezone, open your file and look at the times of your trades. If they correspond to your local time zone, choose that. If not, then check if it's the timezone of the exchange (for the US, it's US/Eastern). If that's not the case, you will have to contact your broker. Finally, the currency is the currency in which the prices are reported in your file.
- You can choose to attach tags to all your trades if you want to, but it's mostly not necessary as you can always add tags using group apply in the dashboard.
- Finally, click on browser choose your file and click Upload.
The upload process typically takes anywhere from a few seconds to a few minutes depending on the type of trades you have and the no. of trades in your file. Once you see the trades added a message at the bottom right corner, you can head over to your dashboard and check your trades. Note that the message at the bottom right corner will typically report the total executions/trades imported but actual numbers MAY vary as there are multiple stages of grouping depending on your advanced import settings.
We have made the advanced import settings very simple on the v2 import page. If you are an intraday trader, choose the "Scalper/Very Short Term Trading" profile. If you hold your trades for more than a day or engage in regular swing trading, choose "Swing Trading". If you either fall in both of these categories or neither or if you are not sure, then choose "Default/Custom". You can always open the advanced import setting section to further fine-tune the settings but for most cases, we find this is not needed.
Finally, you can import the same file or an updated version of the file with new trades without worrying about duplicates. TradesViz does de-duplication primarily based on execution timestamp + symbol so all already existing executions will be ignored. However, if you delete an execution/trade that came from an import or auto-sync, that execution is no longer in the database for the de-duplication check, so the same broker execution can be accepted again by a later import or sync. If you want that execution to stop affecting P&L/statistics, edit the existing trade/execution quantity and price to 0 instead of deleting it. If you want to delete it completely and prevent auto-sync from bringing it back, move the connection Sync from date to after that trade's date before syncing again.
Note about metrics not appearing after import: If you do not see stats like MFE/MAE, exit stats immediately after import, it is normal because the system automatically calculates all of these stats at the EOD of every import - meaning, the calculation happens in batches every day after market closes. You can always recalculate a trade to force the system to generate the settings by doing the following:
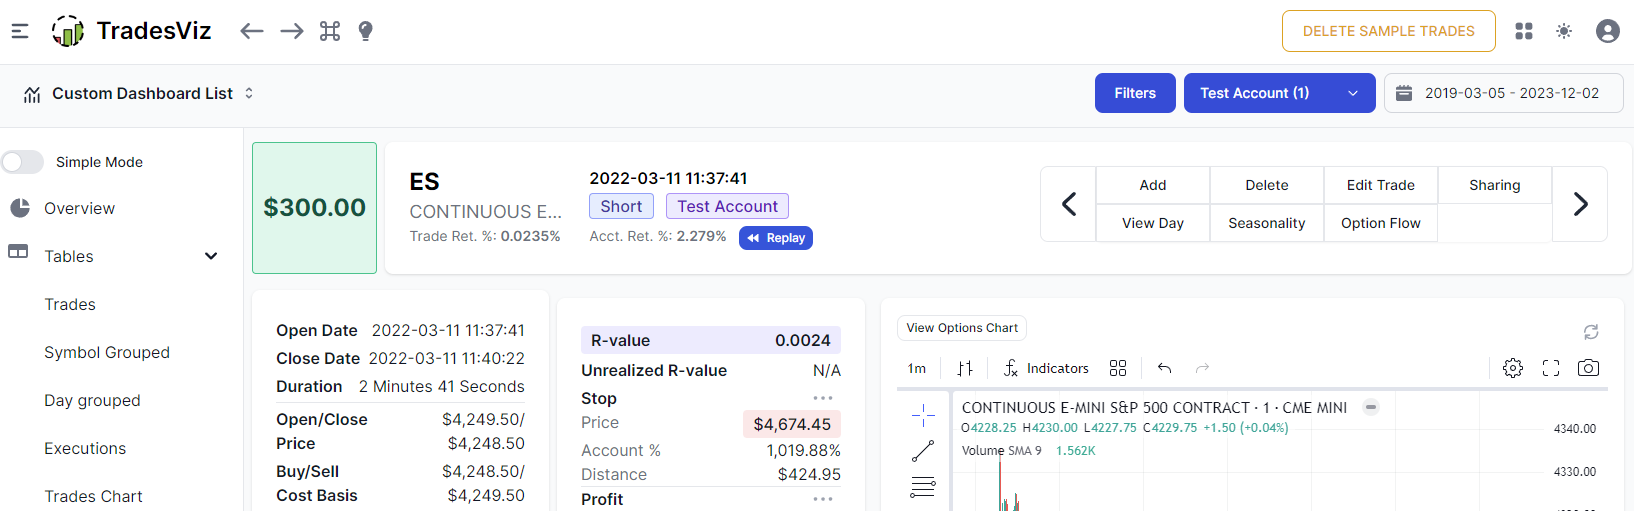
- To recalculate any single trade, explore the trade by clicking on the target button next to the trade in the trades table and click on the "Recalculate" button above the executions table.
- To recalculate many trades at once, you can use the group apply function. In the trades table, shift/control-select the trades you want to recalculate and click on the "Group apply" button at the top of the table. Now scroll down click on the "Re-calculate all selected trades" option and click "Save changes"
Note about reporting errors/issues with import: To make supporting you efficient and fast, please provide full context when sending us an email or chatting with us regarding an import issue. Make sure to include:
- Broker/platform name
- Which instruction set you followed (if multiple are present)
- The file you tried to import (as an attachment)
Finally, here are some common issues/questions:
- If the file is imported successfully but if you do not see any trades, it could be that you are on a free tier and that you are importing a non-stock transactions file. Pro and Platinum tier users can import all asset classes whereas, free tier users can only import stock asset types.
- If the file is imported successfully but it says no new trades are added, it means all the data in your file is already present in the system. It could be that you are importing an old file or your broker has not provided you with an updated copy of your reports.
- If you are sure that the file you imported is correct but you still receive a message and if you have imported the same files before, try downloading one of your previously imported files by visiting the "Manage/Export data" tab on the same page > select your trading account > download any recent file and comparing the files by opening them.
Syncing your trades
When we say "sync", we mean a process where the step of importing a file is eliminated. As such, there are defining 4 types of syncing of trades to TradesViz which we describe in detail below. You can check the full list of all types of auto-import options available in this blog post.
100% Auto Sync from the broker
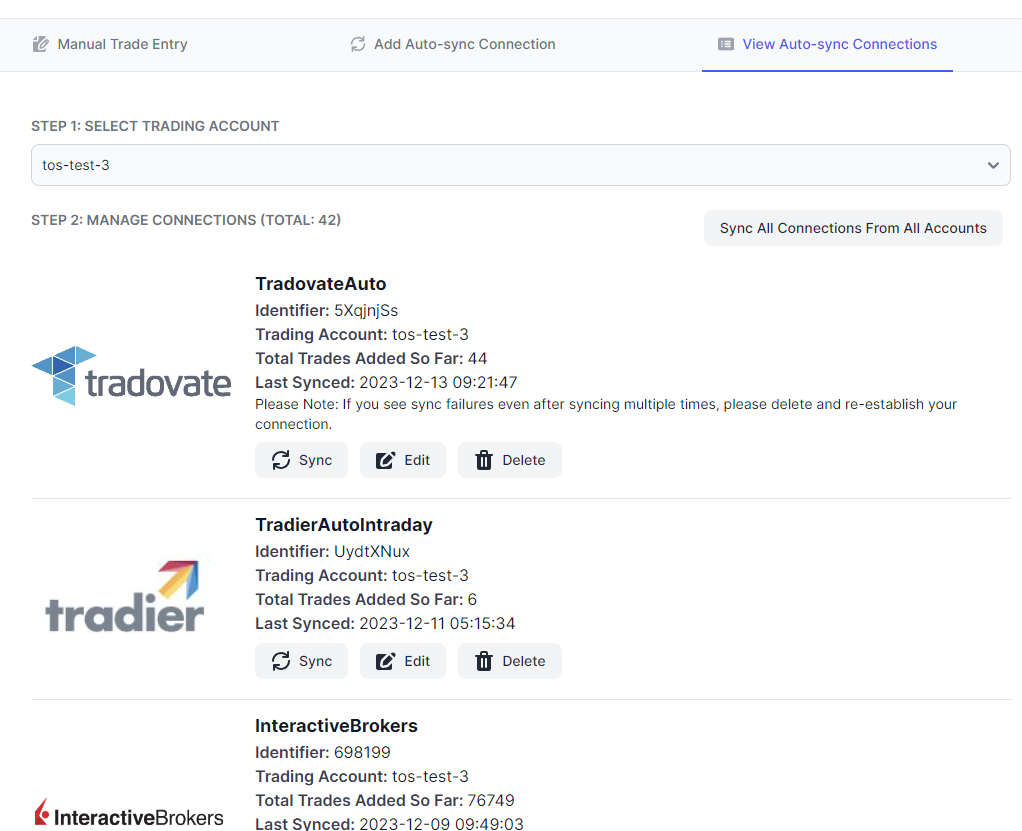
This is the most popular type of syncing where you add a connection to your broker on TradesViz and we take care of syncing your trades automatically every 24 hours. It is also possible to manually sync any of your connections by clicking on the "Sync" button in the auto-sync list ("View auto-sync connections" > select trading account). This is a safe method where we establish a read-only connection with the broker to get data directly from them via their official APIs. This is the EASIEST way to get your trades into TradesViz and also continue to get trades updated automatically every day.
To add a connection to your broker,
- Visit tradesviz.com/import [or] click on the profile icon on your dashboard (top right corner) and click on import/export [or] click on the upload icon at the bottom left corner of your dashboard.
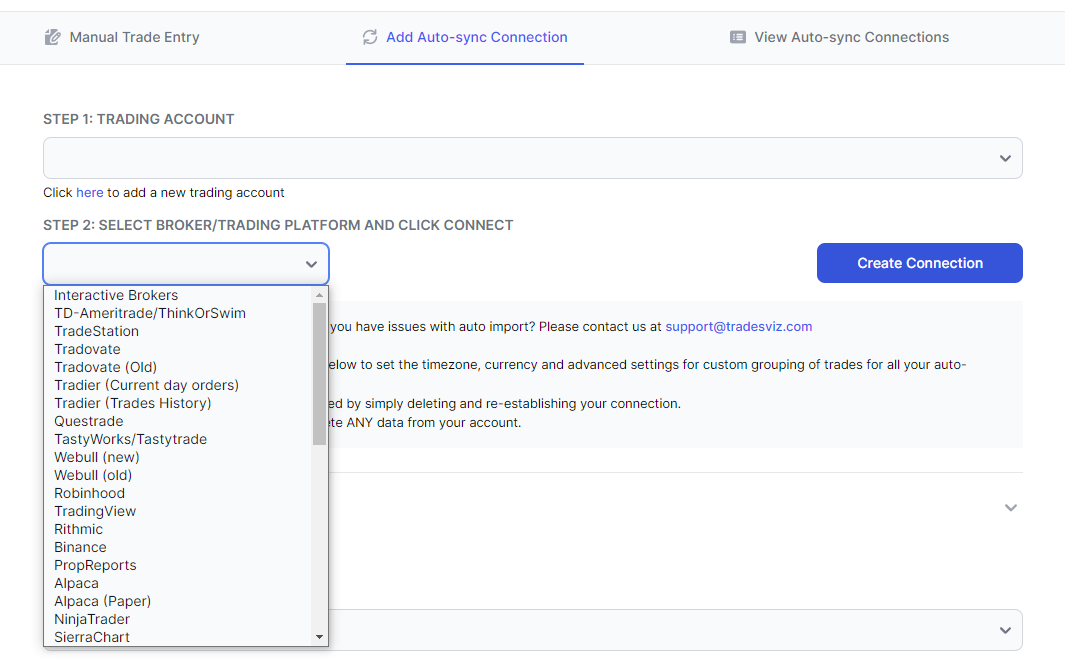
- Once on the import page, click on the "Add auto-sync connection" tab
- Now select your trading account (same notes as in manual import apply here) and the broker you want to add a connection for
- You will see a "Create connection" button. Click on this button and follow the steps precisely to establish a successful connection. Do not ignore any steps here. Each broker has a unique instruction set.
99% of connection issues are due to NOT following import instructions
- After a connection is established, you will be taken to the Auto-sync connections page where you can edit, sync, or delete the connections.
Notes regarding connections: A broker connection can be deleted at any time. This will NOT delete any data that was already added to your account as part of previous syncs.
You can edit the name of the broker connection ("Identifier") by clicking on the "Edit" button on the connections list page. For some connections, you are also able to edit the sync from the date (the date from which you want the trades to be imported). For some crypto connections, you can edit the list of coins you want to sync (this drastically speeds up the sync process).
Finally, remember that each broker has their own rules for how long of a trade history you can sync and when the connection expires. This depends on the broker and can change at any time so we do not have a list for this. If your import was working but it suddenly stopped, please try deleting and re-establishing a connection. If you are not able to see all of your trades, it means the broker has limitations on how far back we can fetch data. For example, TradeStation allows only 15 rolling days of import whereas IBKR allows up to 365 days via the flex query.
Once again, this is not under our control. If you are seeing data missing, it means you need to first import history via manual import and then create a connection with a sync from the date after the date of the last execution in the manually imported file so that there is no overlap and you can get data synced from the last day onwards.
API-based sync from the broker
Some brokers have heavy limitations on the time period of access to data. For example, a normal Auto-sync broker connection can keep working for months without any issues until the access token expires. But for some brokers, the access token validity is less than one day or there is no way to access trades without passing in account credentials which we do not store on our side. Such brokers are Rithmic (require credentials), Robinhood (5-mins period of access token expiry), and pretty much all Indian brokers.
This is not a limitation on TradesViz - rather, how the broker has decided to set up their data access or how they are required to set up data access based on the government rules of the region/country of the broker.
Therefore, this is not pure 100% auto sync, but still better than manually following instructions to export a file, save, and import it into TradesViz. These brokers are NOT under the "Add auto-sync Connection" tab. Instead, you will see them in the normal "Upload file" tab's platform list. You will notice that some of the listings contain the suffix "API-Auto-Sync". These are brokers that offer the kind of API sync we have explained above.
Like the connection process, each broker has a unique way to require the users to enter certain information. Once you select the broker, click on the "Login & Sync" button that appears at the bottom and follow the instructions *exactly*.
Real-time sync
As the title implies - this is a sync method that sends trades to TradesViz in real time as and when you make an execution. This is only available for 3 trading platforms at the moment: NinjaTrader, MetaTrader 5, and SeirraChart. As long as you are using any one of these 3 platforms, you can sync your trades in real-time to your TradesViz account.
There are some limitations to be noted here:
- You need to be adept enough to manage the indicator settings and accounts if you have many accounts. If you are just starting to use TradesViz or any of the above-mentioned platforms, we highly suggest using normal manual imports till you get used to both platforms.
- This is a real-time sync-only process. This has 2 main downsides:
- You can ONLY sync the trades that are currently being executed as the indicator is open and active - no historical trades are synced and no syncing will happen if the client is closed or if the indicator is not running
- Even if you miss one execution (either due to disconnection network issues or improper setup of indicator), every other trade made from that time onwards will be incorrect due to FIFO grouping.
If you want the real-time sync to work well, make sure to FULLY and thoroughly read the respective blog posts for each platform linked. If this is too much work for you, stick with manual imports. These are the best available solutions at the moment for these platforms. TradesViz is the only journal in the world to have such syncing capabilities but with great features, comes great patience and the ability to debug by yourself locally ;)
Misc.
The other type of sync does not belong to any category mentioned above but is a process that still eliminates the manual import needs. Right now, there are two such types of systems in our list of ~40 brokers/platforms.
- TradingView: Due to high demand and popularity, and despite TradingView not having an API, we came up with a novel way to sync your trades from TradingView via a browser extension.
- Google Drive: As weird as it may sound, we found a way to leverage Google Drive's auto-sync capability to automate or eliminate the manual import process. The positive side of this is that this works for ALL brokers. It's a very useful solution if you use a broker/platform that exports locally to your desktop since you can just point that to your Google Drive folder and add the link to TrdesViz as a connection. This is available in the "Add auto sync connection" page's platform list.
Manually adding trades
While auto-imports are all the rage now. The good 'ol manual import is still the go-to for many traders who have lesser trading frequency and prefer to write down the numbers by hand. Before going into the different ways of how you can add a "trade" or an "execution", first let's break down the terminology we use at TradesViz:
The difference between a trade and an execution
Execution: An execution is an atomic unit of a transaction. Example: "Buy 100 shares of AAPL". An execution by itself can only have price, quantity, time etc., and not PnL.
Trade: A trade is a group of one of more executions. In TradesViz, any execution will always have a trade that it belongs to. Example: Buy 100 shares of AAPL, Sell 100 shares of AAPL. A trade will have a lot more attributes such as PnL, MFE/MAE, duration, etc.,
When importing files, you are generally importing orders or individual executions from the broker. In the end, after grouping the executions into trades, you will have a lesser no. of entries - i.e. lesser no. of trades than executions because multiple executions will be grouped into 1 trade. This is normal.
In TradesViz you can view your executions via the Executions table or trades via the Trades table.
Add trade (dashboard/import page)
Based on the above difference, you would have guessed that when we say adding a trade, it pretty much means, you are creating a "trade" by adding an opening execution so technically, you are just adding an execution and this can be done in two ways:
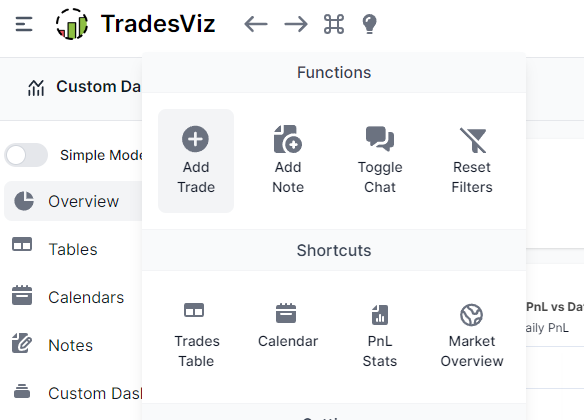
- Click on add trade button in the popup that appears at the top right corner after you click on the command button
- Visit tradesviz.com/import and click on the "Manual trade entry" tab
Typically, most traders use the add trade button in the dashboard as it's more convenient.
Once a trade is added, you might ask where or how to close it.
Remember that a trade is simply a collection of executions so we need to add a closing execution to this trade. Which is what we will explore in the section below.
Add execution (trade explore)
To add execution to an already existing trade, you need to explore the trade by clicking on the target icon in the trades table and clicking on the "Add" button on the trade explore page. This will show a popup with fields like price, time, etc., You can use this to add to your positions or close your position.
Closing trade (copy/group apply)
Closing a trade simply means adding an execution of the opposite side of the remaining quantity's sign. If you have 100 outstanding shares, you need to add a sell execution. If you are short 100 shares (owe), you need to add a buy execution. The process of adding execution explained above can be used. However, there are two shortcuts that can save you some time:
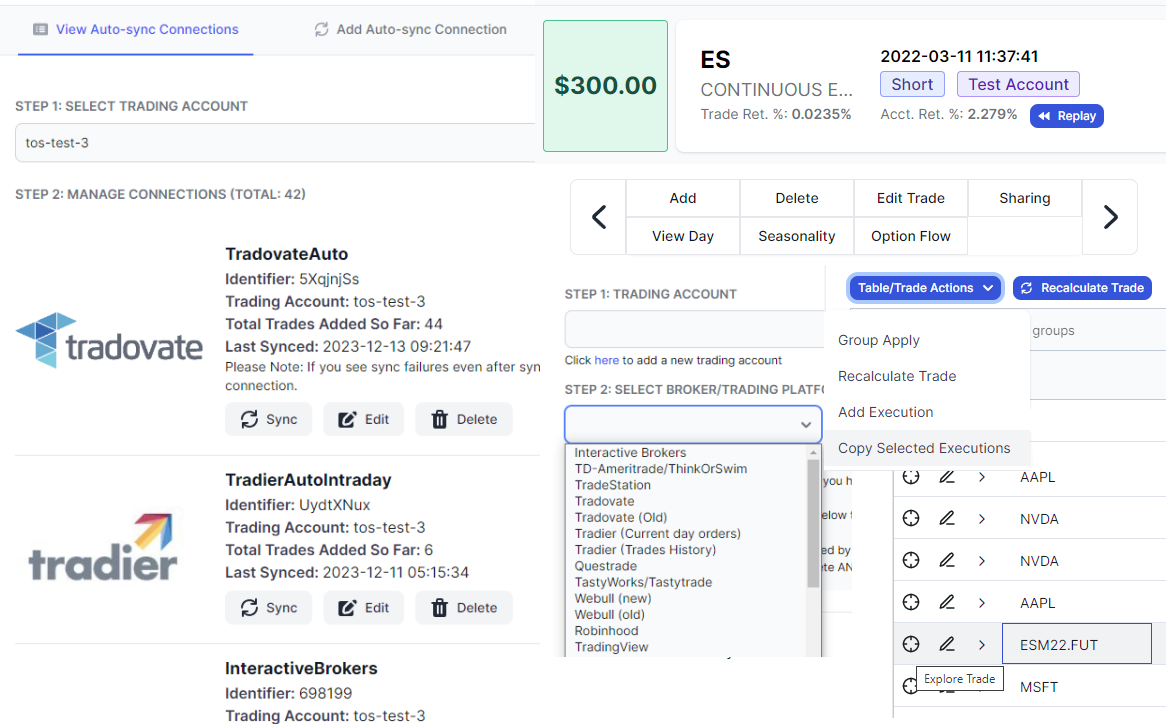
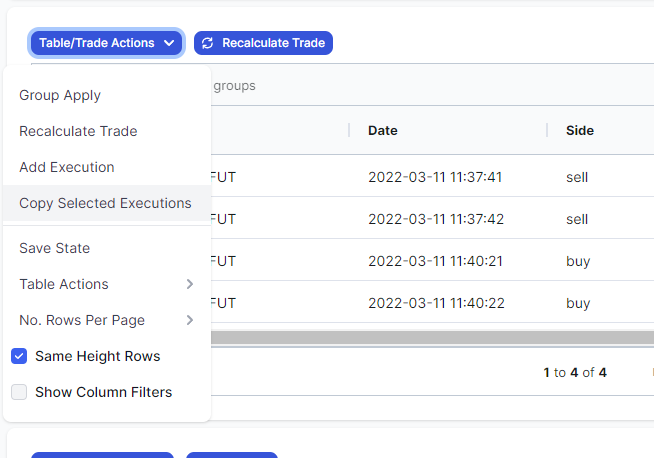
Copy execution & Edit: Did you know that you can copy/duplicate any execution by clicking on the execution(s) you want to copy/duplicate and then clicking on "copy executions" in the trade actions dropdown at the top of the executions table in trade explore? This is a great way to save time filling in all the fields again if you just want to add a new execution but most of the other fields remain the same.
Group apply's Close trade function: Using the main trades table's group apply function, you can "close" several open trades. Now what does close here mean exactly? It simply adds a closing execution with the same price as the last execution thus making the trade closed. You can, of course, EDIT the execution to change the price to anything you want.
Ways to edit/delete trades and executions in TradesViz
Editing a trade:
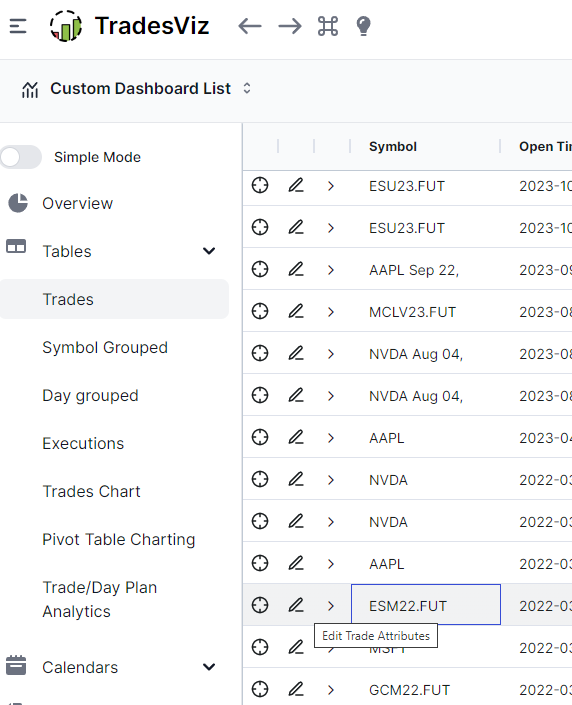
A trade's attributes such as tags, notes, stop loss, etc., can be edited by clicking on the pencil icon in the main trades table or by clicking on the "Edit" button on the trade explore page.
Deleting a trade:
To delete trades, there are 3 ways:
- Delete individual trades by exploring a trade by clicking on the target icon in the trades table row > click on the delete button at the top right corner
- Delete a bunch of trades at once using group apply: Shift-/Ctrl-select the trades you want to delete in the trades table > click on the "Group apply" button at the top of the trades table > scroll down and check "delete all selected trades" > save changes
- If you want to delete an entire import, go to tradesviz.com/import > export/manage > select your trading account > click delete on any of the imported files list
Editing an execution:
- Click on the target icon in the trades table (of the execution's trade that you want to edit)
- This will open up a popup with all of the execution's info - scroll down to the executions table and click on the pencil icon to edit attributes like price, quantity, date, etc.,
Here's a video showing trade explore, trade edit, and execution edit:
Deleting an execution:
To delete executions, there are 2 ways:
- Click on the target icon in the trades table (of the execution's trade that you want to edit). This will open up a popup with all of the execution's info - scroll down to the executions table and click on the trash can icon to delete that execution
- You can also use table actions > group apply to delete multiple selected executions.
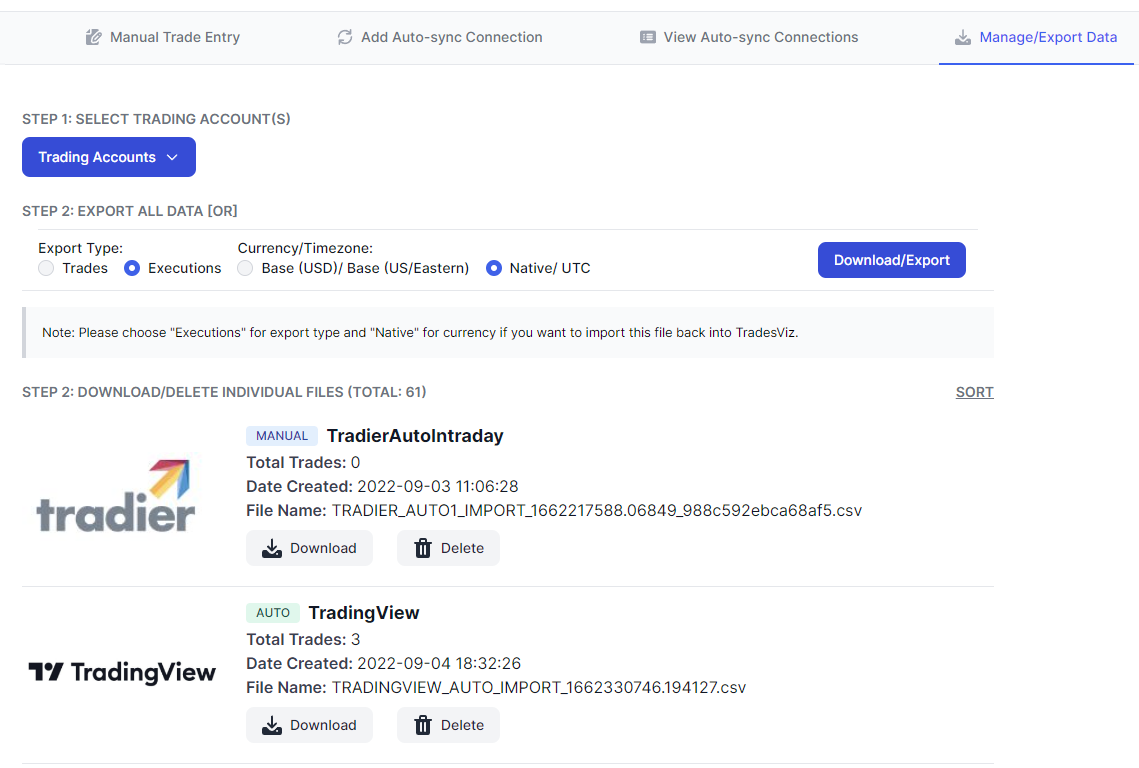
Deleting trade imports:
- Go to tradesviz.com/import
- Click on "Manage/Export Data" tab
- Now select your Trading account(s)
- You will now see a list of all the imports that have. Here, you can click on the "Delete" button on any import
Note: Deleting the import file will delete all the executions/trades that were added to your account when this file was via TradesViz. This will also delete the tags, notes & images associated with the deleted trades
Clearing trading account
If you want to simply clear everything, this is the simplest way:
- Go to https://tradesviz.com/accounts/tradingaccounts/
- Click on "Clear trades" on the accounts you want to clear data
Note: This action will delete all the executions/trades that are part of the trading account. This will also delete the tags, notes & images associated with the deleted trades.
That's all the operations you can do with your data on TradesViz. We hope this serves as a comprehensive guide on adding and editing on TradesViz. If you have any questions, please don't hesitate to contact us at [email protected]!