Please note: The following guide is for TradesViz 1.0 (old) which is no longer supported.
We have migrated/upgraded to TradesViz v2.0 which is superior in UI/UX and features.
Please visit this guide to learn more about import, export, and trade management in TradesViz v2.0: https://www.tradesviz.com/blog/import-complete-guide/
TradesViz currently supports 3 methods of importing trades into your TradesViz accounts.
- Manually add trades one-by-one
- Import trades by uploading account/trading summaries from your brokerage account.
- 100% Auto-import trades directly from brokers
Manually adding trades
This is a very easy way to quickly add trades if you haven't made them or are planning to make these trades. There are 2 places from which you can manually add trades.
From the import page (tradesviz.com/import/)
This is the easiest and fastest way and easiest way as it does not require you to navigate to your dashboard. Upon visiting tradesviz.com/import/, on the left side, click on "Trade entry".
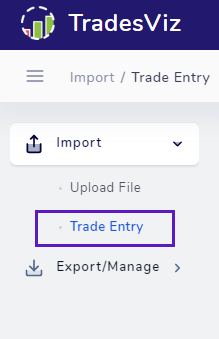
This should open up an "Add Trade" tab with all necessary fields for entering a basic trade.
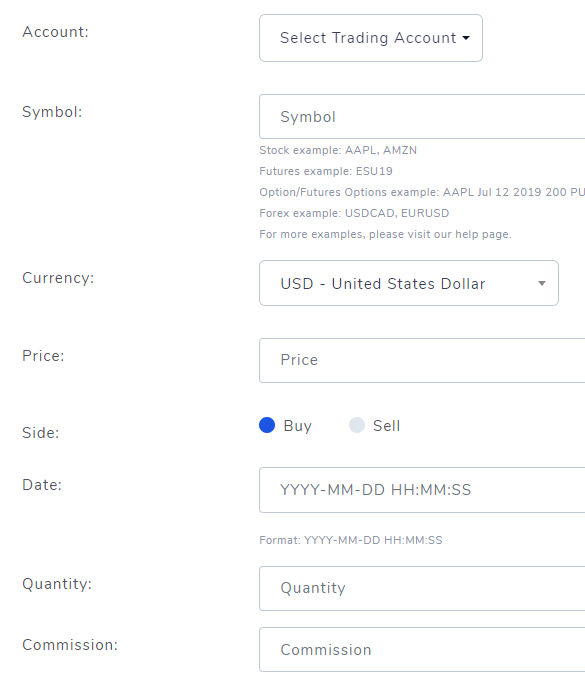
Fill all the trades into and optionally add comments in full rich text and tags and save changes to add your trade. This form will automatically refresh so you can keep entering more trades if you wish.
Update (13th Nov 2020): You can now add complex option spreads easily with our modified add trade form. Check out our detailed post about it here.
From the tables view in your dashboard
It's better to choose this method if you are actively interacting with charts and tables in the dashboard as you don't need to navigate away from the main page.
On the home page (tradesviz.com/home), click on any of the tables under the "Tables" tab on the sidebar.

After clicking on a table view, on the top right corner, you will see an "Add trade" button. Click that button to open an add trade popup with the same fields as mentioned in the previous method. Once filled in all the fields, click "Save changes" and the trade will be added. Note that you may have to refresh the page for the trade to show up and be used in trades tables and charts respectively.
Note that adding a "trade" here (an in the previous section - i.e, adding via the import page) just means, you are adding an execution that starts a trade. In TradesViz, the most granular level of data is an execution - executions make up trades. In other blog posts, you will see how to manage executions and trades by group operations.
Another important thing to note here is that every single execution (and thus trade) can only belong to one single trading account. Also, when you add a trade, it might not show up in the trades table tab - this could be because the current global filters - i.e, the filters dropdown and the date range that you see on the top right might not contain this trade. For example, if your current range is 2018-11-14 to 2020-04-21 (like in the image below), and you add a trade with date 2020-04-25, you will not be able to see that trade unless you change the date range filter to also contain 2020-04-25. This behavior is in contrast to what happens when you refresh the page because the date range is automatically calculated based on all the trades in the selected trading accounts before loading fully the page.

You will be able to select to which trading account you are adding a trade to as the first field in both methods mentioned above. Once again, there are functionalities in TradesViz that allow you to copy or even move trades between your trading accounts in bulk. These operations will be explored in another blog post.
Importing trades files from brokers
Adding trades one-by-one can be useful in many instances especially if you are a beginner and are just starting to trade, but if you already have a trading history and want to import your entire trading history into TradesViz, it's easy to do so.
TradesViz currently supports 80+ broker-formats + 2 custom formats. These formats are explained below:
Broker/trading platform formats
We currently support 80+ popular broker formats that can select in the import menu to directly upload your exported trades file from the brokers to TradesViz. Your file will be uploaded and all trades and trade-related info will automatically be parsed by our systems. You do not need to do any other steps. After importing, you will be notified whether the process was successful and how many trades were imported. Step-by-step instructions on how to export from your broker/platform will be shown in the import page itself.
Custom formats
In TradesViz, you can export trades from your trading accounts into CSV files. These files can be re-used by imported them back into TradesViz by selecting the TradesViz format.
The other custom format is one that users can fill themselves - this is the fastest way to import trades if you have trades stored in a currently unsupported format. This format contains all the basic fields that define an execution. The sample file can be downloaded here. You can download this file and fill it up with your trades and upload this file to import your trades. The sample file already contains examples for all the supported asset types.
Note that if you are using either the broker-based formats or TradesViz's exported format, we suggest that you do not edit the contents of the file in any way as it sometimes can cause loss of data or lead to incorrect parsing.
If your broker or platform is not among the list of the supported formats on the import page, please contact us at [email protected] with the name of your broker/platform and the file that you want to import. We will add the format to TradesViz as soon as possible.
100% Auto-import trades directly from brokers
TradesViz also has support for 100% automated imports. The way it works is as follows:
- You connect to your broker's platform via a secure read-only link
- Once a connection is established, the TradesViz system will automatically fetch trades from the broker's servers every 24 hrs or whenever you want, you can manually click on "Sync" button on the auto-import page.
We have a dedicated blog post exploring all the different types of auto-sync we support and also the list of brokers on this page: https://tradesviz.com/blog/auto-import-trades
Import settings
Importing via the importer tool allows you to customize how your trades are imported. This section will explore all the other features surrounding an import of a trades file.
As with the manual trade addition, every import should first start with choosing a trading account to import the trades into. After choosing this, you can set the broker's default currency and timezone. If you are using custom format or TradesViz format, this is your own account's base currency and timezone.
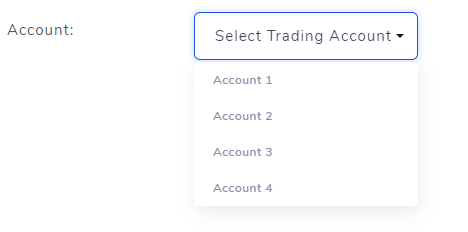
If your broker's export format does not mention the currency of trades, it's best to mention this here. The timezone is by default is autodetected by the system based on the browser's locale. If your broker does not export the executions in this timezone, do set the in which your broker exports the executions in.

Moving on to misc. attributes, you can add tags to the import file - these tags will be applied to ALL the trades that are imported from the currently uploaded file. In addition to this, you can choose whether or not to use commissions defined in your trading account settings. Checking this box overrides the commissions in the imported file. Remember that you can set commissions for each asset type for each of your trading accounts on the user settings page. More details about all the user settings and trading accounts will be explored in another blog post.
Advanced settings
In TradesViz, you can even choose how the executions from the files you import are grouped. We understand that there are several types of assets and that there might be trades that involve several assets of the same underlying. To counter this issue, you can try modifying the Trade grouping type and Trade split conditions settings under the advanced settings tab.
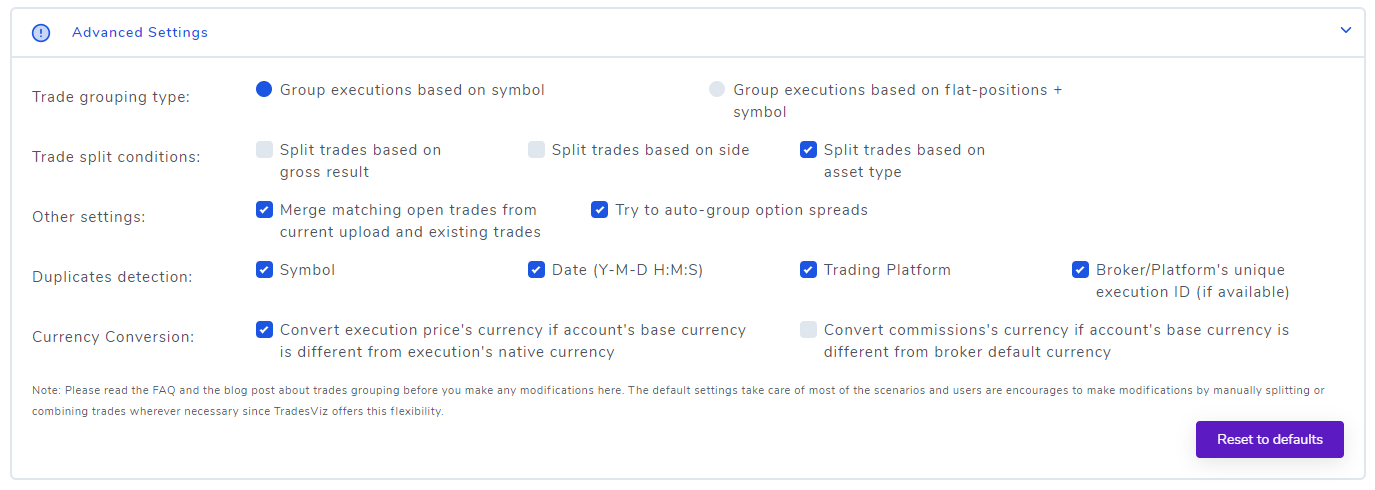
Grouping executions based on the symbol - this means that if there are several executions of a particular symbol - say, AAPL - all the executions from AAPL will be grouped into 1 trade irrespective of the position size change. Of course, the executions will be split - again, based on the conditions selected in the advanced settings shown above. All execution grouping are FIFO (First-in-First-out) based. You can choose - depending on your trade style and preferences how and when the split of executions into trades should happen - for options, it might be better to use grouping executions based on positions + symbol so that once a position becomes flat during a FIFO grouping, those executions will be treated as a single trade, on the other hand, using this for stocks might cause the system to generate too many trades if there are many points during the execution when the positions were flat (i.e zero quantity of shares left).
The next setting is whether to merge the trades from the currently imported file with existing trades or not. There might be situations where you want to add as fresh trades and keep the open trades - if so, choose this option. But by default, we think keeping this option turned on satisfies most cases.
Update (13th Nov 2020): The other setting we have introduced recently is the option to try and merge option spreads. Most brokers don't report details about option spreads and just list the executions. But when grouping we need to perform additional bookkeeping to properly merge these trades. This feature will perform the necessary functions to merge the spreads as accurately as possible. Note that even if spreads are not merged, you can easily merge executions and trades manually using our drag and drop feature:
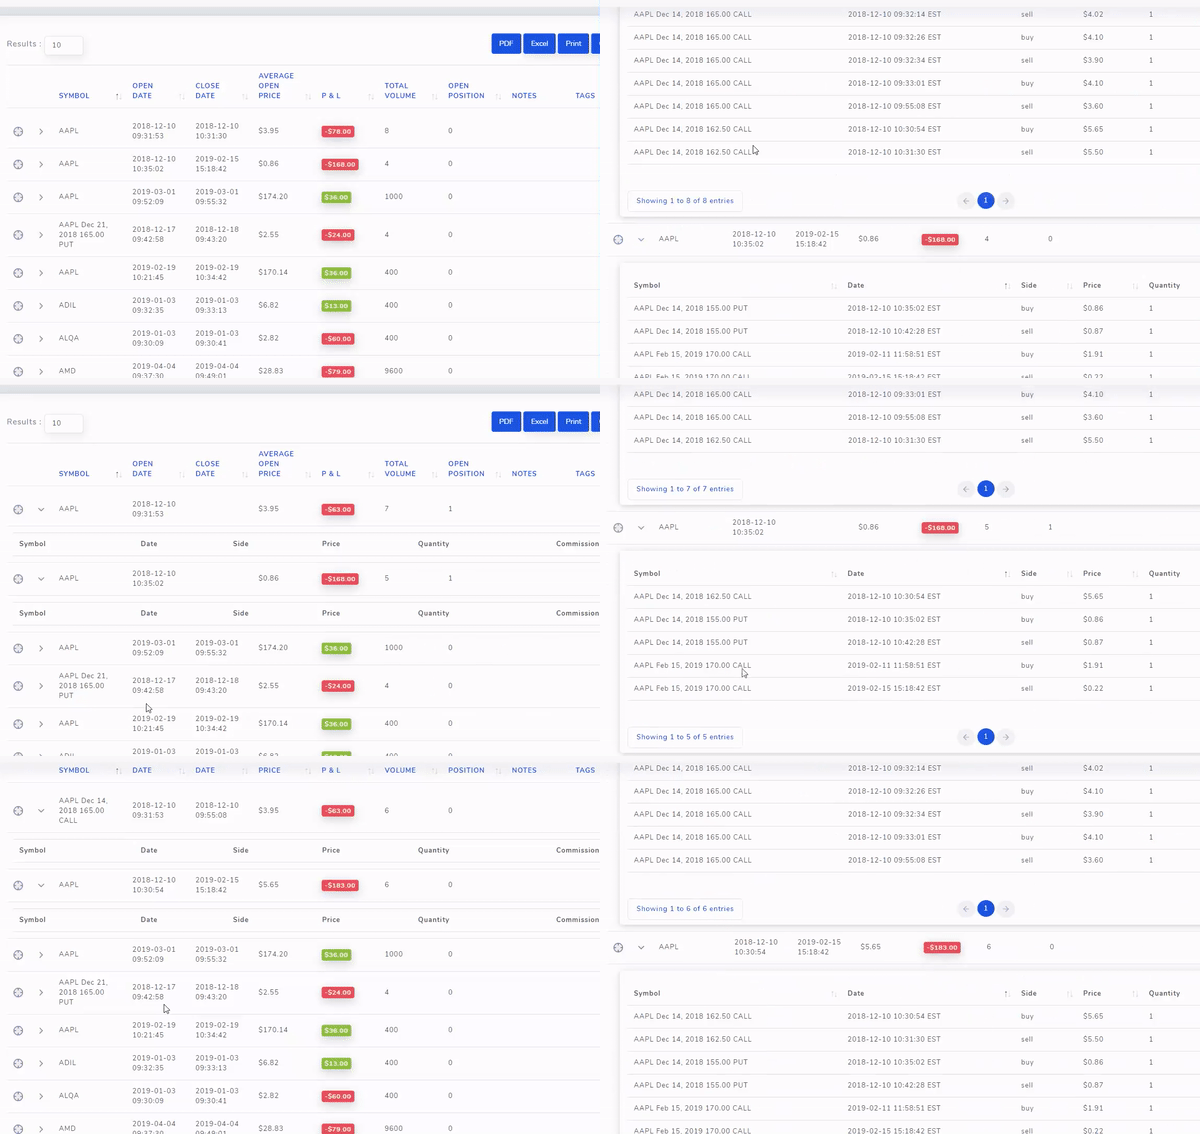
To use this, just drag an execution from one trade to another - that's it! TradesViz will automatically re-calculate the stats and refresh the page.
If you are frequently uploading large amounts of trades, it might be useful to check all duplicate detection columns so that no duplicates occur. Note that duplicate checking based on ALL the selected options - i.e, if symbol and date are selected, BOTH symbol and date are used during duplicate checking.
Finally, currency conversion can be a pain if you are trading in multiple exchanges around the world. To solve this, we have 2 methods. One is setting the base currency and checking the "Display all price-related fields in base currency" box in the user settings so that all the currency fields in the dashboard is in your base currency. But the matter of handling commissions is a bit complex. Since most brokers charge commission in the currency of the account, it can be problematic if you upload trades from several accounts with different base currencies onto TradesViz - this is the other problem that is solved by this commission setting.
For example, if you are primarily trading in the US markets with accounts also in the Indian market, assuming your base currency in TradesViz is in USD - when you import trades from your Indian trading account where your commissions are ought to be in INR, you should also select the second option ("convert commission's currency") along with "Broker default currency" as INR so that the commissions in INR are automatically converted into USD.
For more detailed examples of how currency settings affect your trades and how to set the base currency for the entire account, check out the account settings blog post.
This is a lot to take in so we usually don't recommend beginner users to mess with these settings. We have observed that the default settings work well and cover 90% of the cases. Grouping and merging issues, splitting of trades can also be fixed using the group apply option in the dashboard in case anything is not per your preference.
Currently supported brokers/platforms
- Ally Bank
- Alpaca
- AMP Futures
- Ameriprise financial
- APEX Clearing (All APEX cleared brokers)
- ATAS
- Axi
- Binance/Binance US
- Bitget
- Bitstamp
- Blueberry Markets
- Bookmap
- Capital.com
- CIBC Bank
- Citi Bank
- ClearStreet
- CMC Markets
- CMEG
- Cobra Trading
- Coinbase
- ColmexPro
- CQG
- Croesus
- cTrader
- DAS Trader Pro
- Day Trade The World
- Degiro
- DBO Securities
- DBS Bank
- Deribit
- Dhan
- Deribit
- dYdX
- E-Trade/E-trade Power
- eToro
- Exness
- F1 Trade
- Fidelity
- Finvasia
- Firstrade
- Firstock
- Forex.com
- Forextester
- FTMO
- FTX
- FXCM
- Fyers
- Gemini
- Hargreaves Lansdown
- HeldenTrader
- HeyForex
- HSBC Bank
- ICICI Securities
- InfinityFutures
- Interactive Brokers/TradeLog Format
- Interactive Investor
- IG Markets
- IIFL
- Iress
- JPM Chase
- JForex platform
- KOT4X
- Kotak Securities
- Kraken
- KuCoin
- Lightspeed
- Merrill Edge
- MetaTrader4
- MetaTrader5
- MotiveWave
- moomoo
- Myfxbook
- Nest
- Nuvama
- NinjaTrader
- Oanda
- OptionNETExplorer
- OKX
- Paytm Money
- Phemex
- Plus500
- PropReports
- Quantfury
- Quantover
- Questrade
- Rithmic
- Robinhood
- Saxo Bank
- Schwab
- Scotiabank
- SierraChart
- Stake
- Sterling Pro
- StockTrader.com
- TC2000
- TastyWorks
- TD Ameritrade (Website format)
- TD Ameritrade Direct (Canda)
- Tiger Brokers
- ThinkMarkets
- ThinkorSwim (TD Ameritrade Client)
- Tradeplus
- TraderEvolution
- TradeStation
- TradeZero
- Trading 212
- Tradingtechnologies.com
- TEFS/TradeNet
- Tradovate
- Tradier
- TradingSim
- TradingView
- TrendSpider
- UBS Bank
- Upstox
- Vanguard
- Webull
- XM
- XTB
- Zerodha
- TradesViz
If you don't see your broker/preferred format in the above list, please send us your trades file sample at [email protected] and we'll add support within 48-hrs.
Please don't hesitate to contact us at [email protected] (or fill and submit the form from here) if you have any issues with importing your trades into TradesViz!
Note: If your broker or platform is not among the list of the supported formats on the import page, please contact us at [email protected] with the name of your broker/platform and the file that you want to import. We will add the format to TradesViz as soon as possible.
