In this post, we will explore how to pair your TradesViz account with Interactive Brokers.
There are a total of 3 methods you can use to sync your IBKR trades into your TradesViz account. This blog details all these methods.
The Active flex query method
This method has the maximum control over your data where you can specify exactly how many days of data you want to import.
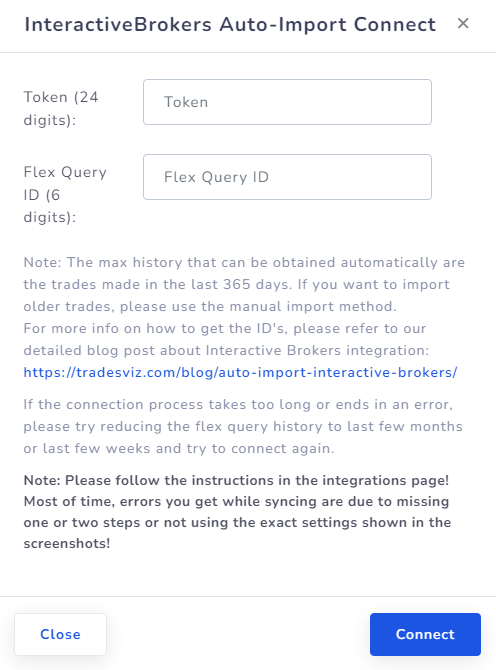
Once you select your trading account and broker as "Interactive brokers" on the trade auto-import page, a popup box will appear when you click on the "Connect account" button.
The purpose of this blog post is to guide you to get these 2 ID's from the IBKR website. Here are the steps you need to follow:
- Log into IBKR website: https://www.interactivebrokers.com/sso/Login
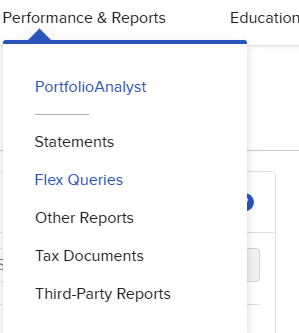
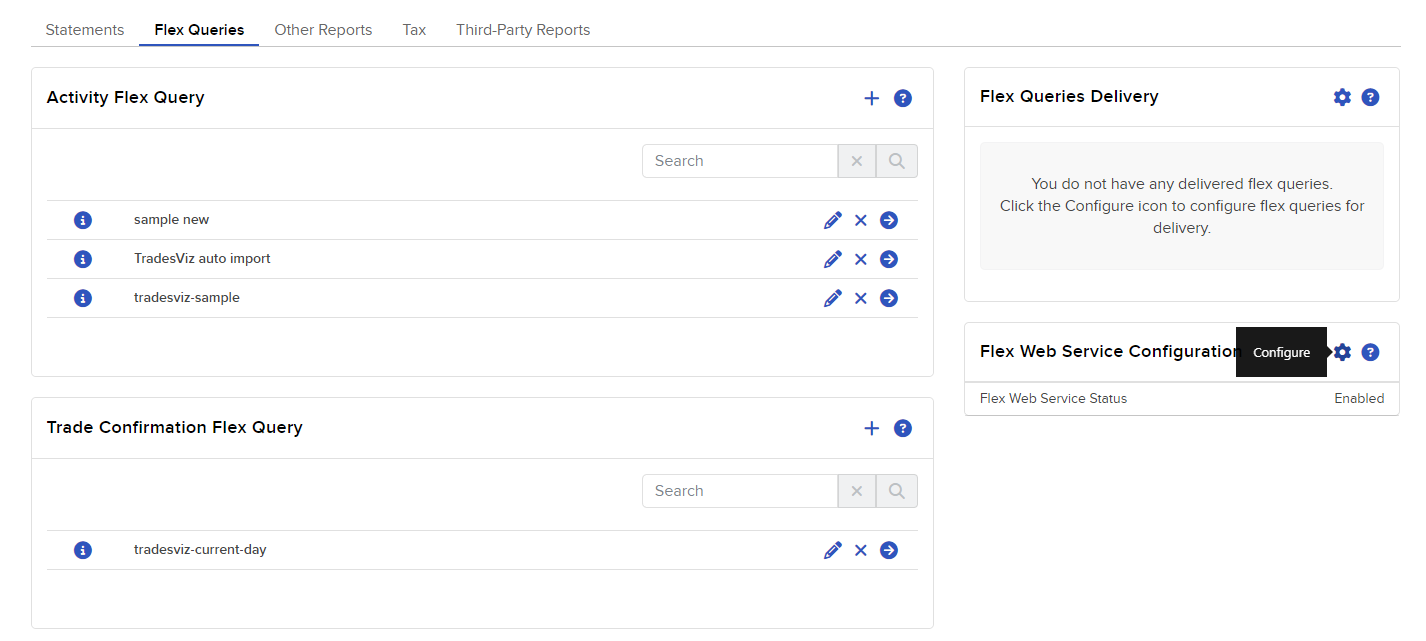
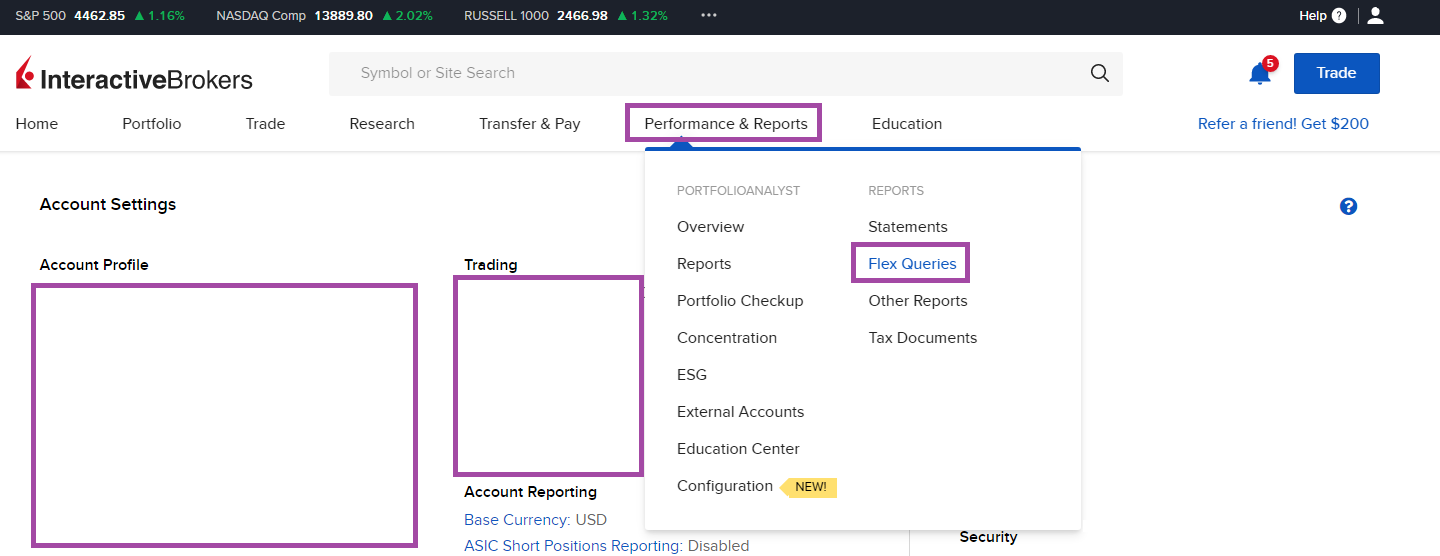
- Click "Performance and reports" and then "Flex Queries"
- Once you see the Flex Queries page, click on the gear icon near the Flex Web Service Configuration Section.
NOTE: If you do not see the flex web service configuration section, try selecting an alternative IBKR account by clicking on the account tag at the top.
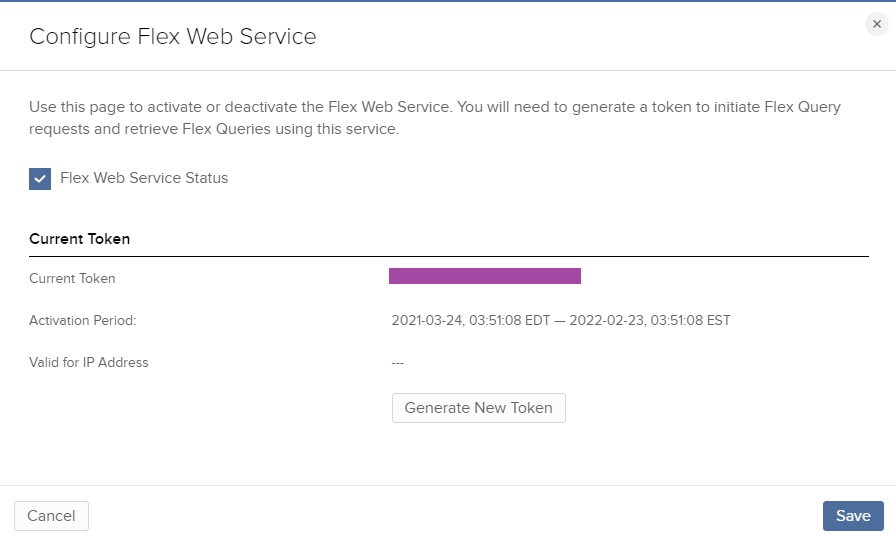
- In the popup that appears, check the "Flex web service status box and note down the "Curren token" number. This is the token that we are going to fill in the TradesViz popup shown in the first image in this post. After you have noted down the number, click "Save".
Note: Please make sure you choose a token with 1-YEAR expiry or click "Re-generate token" and choose "1-YEAR" as expiry! Otherwise, you will need to frequently re-establish your connection.
NOTE: DO NOT use token or flex from "Third party service" and mix it with the normal flex query creation process. - Now, depending on whether you have 'Try new menu enabled', follow (1) or (2) below:
- Click on "Performance & Reports" > "Flex queries"
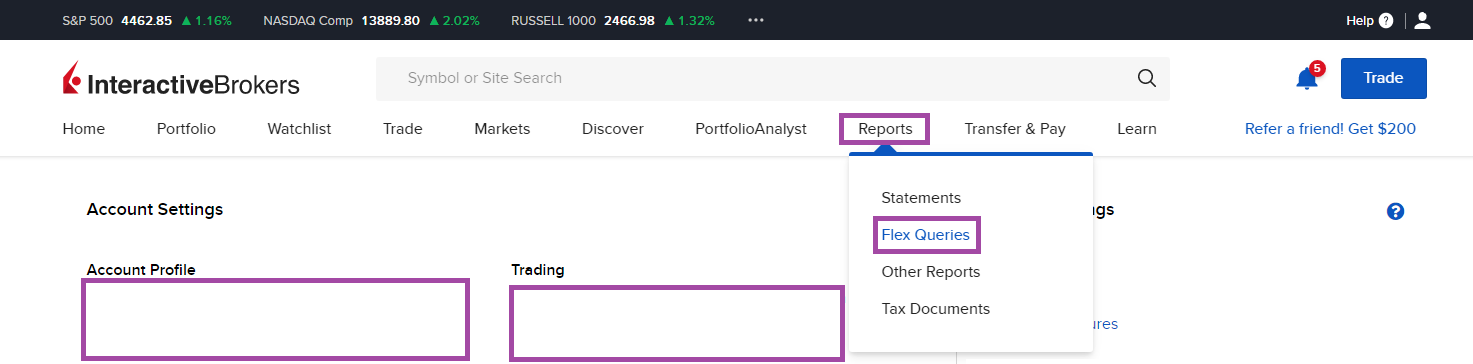
- Click on "Reports" > "Flex queries"
- Click on "Performance & Reports" > "Flex queries"
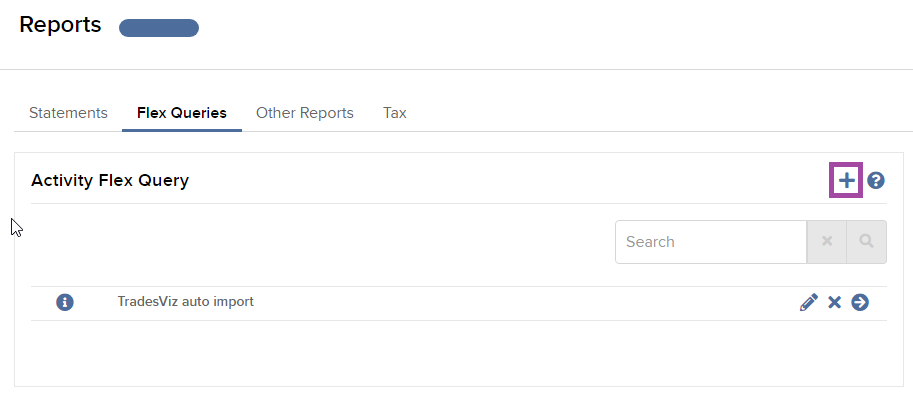
- Next, click on the '+' icon on the right end of the "Activity flex query" title.
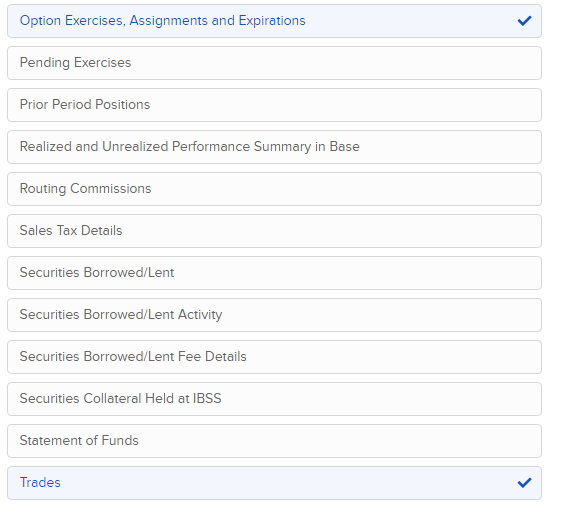
- On the next page, enter the query name (this can be something like "TradesViz auto import") and in the sections below, select "Trades" and "Option Exercises, Assignments, and Expirations".
- In the popup that appears for "Trades", make sure "Executions" is ticked and "Select all" is ticked, and then uncheck the following options:
- Serial Number,
- Delivery Type
- Commodity Type
- Fineness
- Weight
- Related Trade ID
- Related Transaction ID
- Original Transaction ID
- subCategory
- FIGI
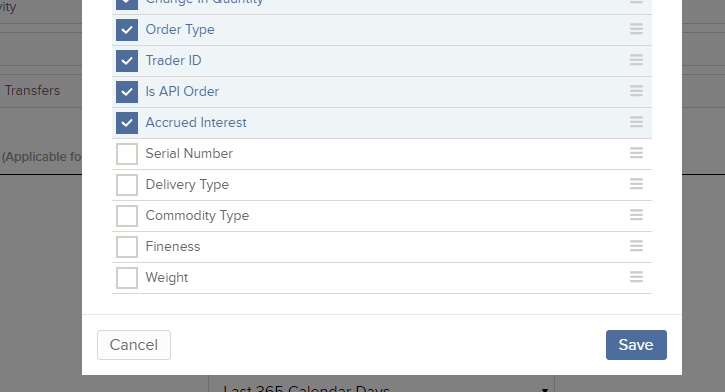
Scroll to the bottom and click "Save"
- In the popup that appears for "Option Exercises, Assignments and Expirations" click "Select all", scroll to the bottom and click "Save"
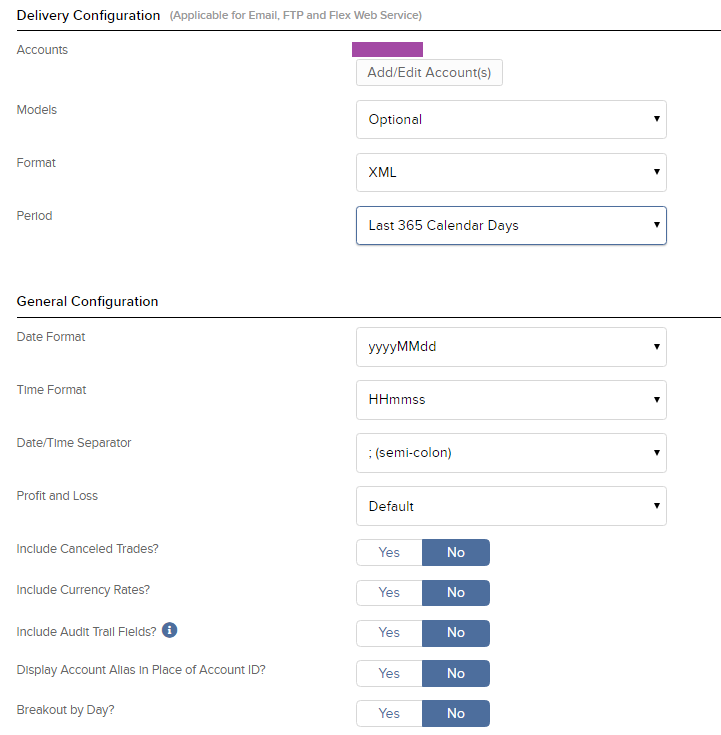
- Finally, under the "Delivery configuration" section, click on the "Period" dropdown and select "Last 365 days" (for the first sync - if you are just starting out, you can use a lower range. Note: Do not use "Last <PERIOD>" where PERIOD is Quarter, year, month, week - use only days!. Leave all other following options as default and click "Continue".
 NOTE: Make sure to create ONE flex for ONE account in IBKR - DO NOT CREATE A SINGLE FLEX FOR MULTIPLE ACCOUNTS!
 - The next page displays a summary of all the options you've set so far - so just click on "Create" at the bottom right corner of the page. This will successfully create a flex query.
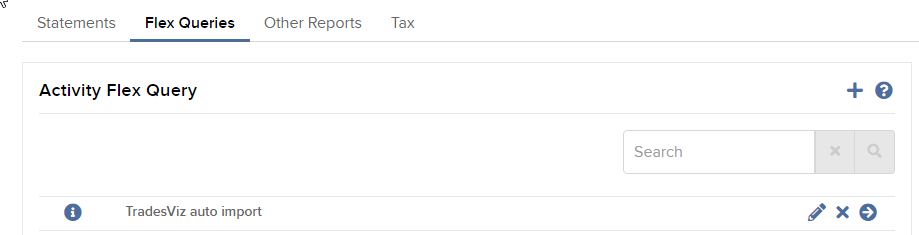
- As a final step, go back to the Flex queries tab and click on the pencil icon next to the flex query you just created. This will open a new page with the Query ID. This is the flex query id that we are going to enter in the second box in the TradesViz popup shown in the first image of this blog post.

- Now, all we have to do is to get the 2 IDs required to link with TradesViz.
Finally, enter the 2 IDs you got from step 4 and step 12 into the box in TradesViz and click "Connect". In a few seconds, you should receive a connection successful message which means the linking was successful. If not, please contact us at [email protected].
Note that flex queries in Interactive Brokers give only read-only access to the information selected in steps 7 and 8. We have no control over your account and cannot access ANY information other than what is given to us from Interactive Brokers.
Update 3rd Dec 2021:
The Trade confirmation flex query method
You can now add a trade confirmation flex query as another additional connection if you want to get sync your trades in near real-time.
What is "near real-time"? So far, we have been using the trade report flex query where we can only get data of your trades AFTER market hours, and sometimes there's even a delay of up to 12 hours even if you try to manually sync your trades. However, with trade confirmation flex query, you can sync your trades manually at the end of the day or a few hours after your trading and you will immediately see your trades populated in your journal.
Here's how to set up a trade confirmation flex query. The steps are very similar to how you would set up a normal trade report flex query.
- Click on "Flex queries" in the tabs under the "Report" heading and click on the '+' icon on the right end of the "Trade confirmation flex query" title.
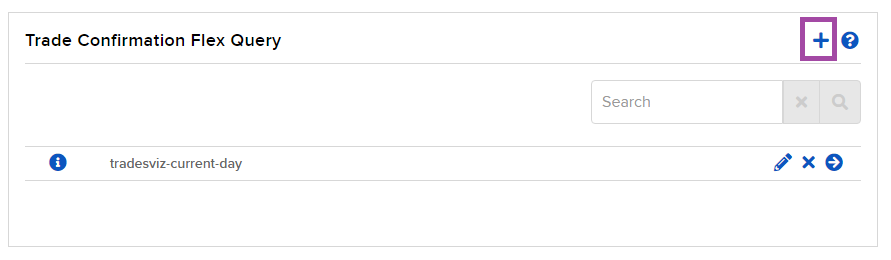
- Now enter the query name (example: tradesviz-current-day) and click on "Trade confirmation" under the "Sections" section and make sure "Executions" is selected and click on "Select all" and click "Save" at the bottom of the popup.
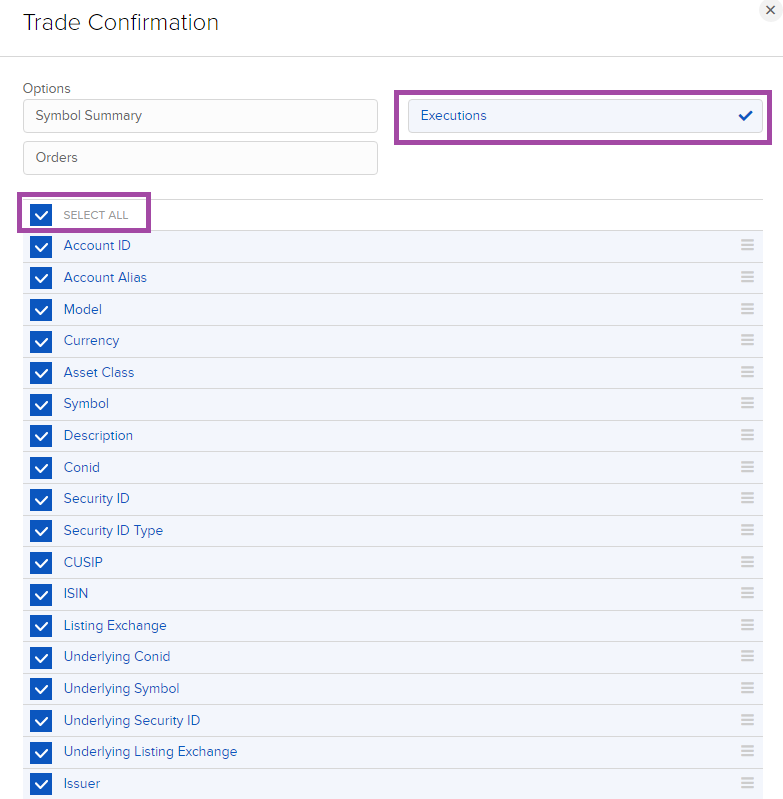
Make sure to uncheck (if available):
1. Block ID
2. Sub Category
3. Ext Exec ID
4. Net Cash
5. FIGI
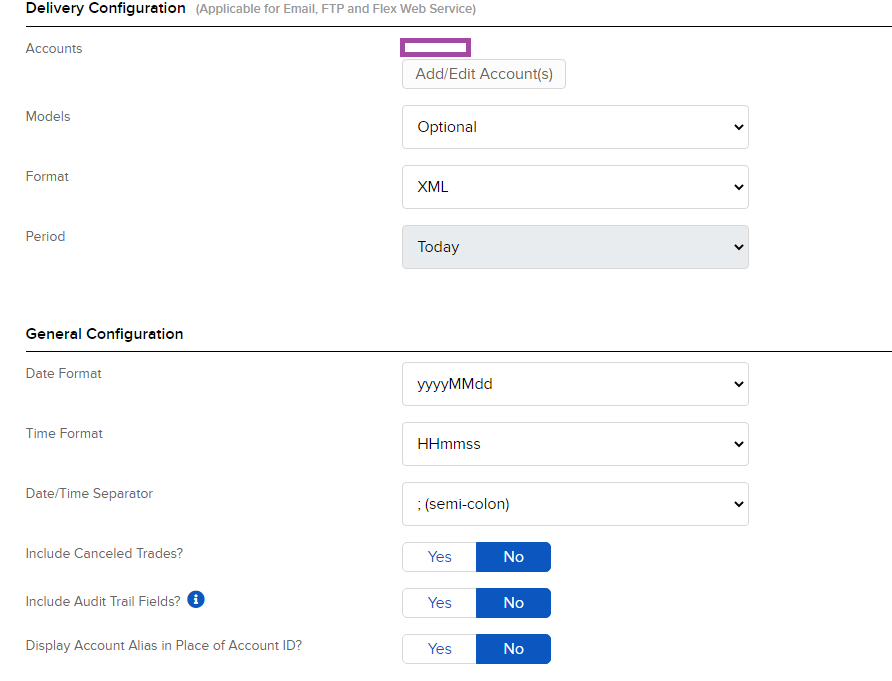
- Make sure the correct accounts are selected and the rest of the settings are exactly same as in the image below.
- Click "Continue" at the bottom of the page and "Create" at the bottom of the next page to complete the creation of your flex query.
- As a final step, go back to the Flex queries tab and click on the pencil icon next to the flex query you just created. This will open a new page with the Query ID. This is the flex query id that we are going to enter in the second box in the TradesViz popup shown in the first image of this blog post.
You can have 1 x Trade report flex query connection + 1 x Trade confirmation flex query if you want immediate trade syncing to TradesViz. Note however that the sync is done for both connections every 24-hrs only. The additional trade confirmation query connection gives you the ability to sync whenever you want to get the trades in your journal immediately.
Update 12th July 2022:
The webservice query/Third-party flex
If you don't want to set up a flex query, there is a new solution for you. It's called the web service query recently introduced by Interactive brokers. Here is what you have to do:
- Log in to Client Portal >Performance Reports > Third-party reports
- Click on the gear icon next to Third-party Services
- Now select "TradesViz" in the list and click Save.
- Token and Query ID will be presented
- Enter the token and query ID into TradesViz like for the other methods explained above in this blog post.
This method has data only for the current day and is not configurable. If you want more flexibility and control over your data, choose the manual active flex query method. If you want to completely skip the flex query construction process, choose this method. Our recommendation is to use active flex + trade confirmation together so that you get historical + current day as fast as possible.
Common issues/FAQs for Active/Trade confirmation flex query setups:
Q: What is the difference between active flex and trade confirmation flex query?
A:
- Trade confirmation flex query:
- Brings in data faster (a few hrs after placing an execution),
- brings in ONLY current-day data
- Active flex query:
- Brings in data late EOD (after midnight),
- brings in ALL historical data (based on your selection in flex settings)
Q: I just made a trade, but I don't see the trade reflected on TradesViz.
A: Active flex query only gets data from IBKR a few hrs after EOD. Whereas, the trade confirmation flex query gets the data within a few hrs of execution of the trade.
Alternatively, if you are using flex query and you are not able to see any trades, it could be due to 2 reasons:
- You are using multiple accounts in one flex query (does not work) - delete the flex query and create 1 flex query for each account you have in IBKR
- You are using "last business day" as history (does not bring in trades) - change to last 15 or 30 calendar days in the flex query history settings
Q: My trade times are wrong
A: If you are only trading US asset types, please use "US/Eastern" as the broker timezone in the auto-import settings. If you trade on multiple exchanges, you need to use your account's country's timezone.
Q: My sync isn't working
A: There could be multiple reasons:
- If you are using trade confirmation flex query and if you try to sync immediately after making a trade, the result is going to be empty which is shown as an error
- If you are sure your active/trade confirmation flex query used to work, but is not working now, it is most likely due to an expired token. Follow till step 4 in the guide above to re-generate a flex query token, delete your existing connection and add a new connection with the same flex query ID and the new flex query token. If you don't want to do this repeatedly, make sure to select a long expiry date for the flex query token when you generate it.
- If you are connecting an active flex query but are seeing an error in your connection, it is likely that your flex query setup is incorrect. Please make sure to follow the EXACT setup mentioned above. Do NOT select any extra data/fields. Save your flex query and try re-establishing your connection again.